EDM for Sage X3
Installation
Pre-requisites
Licensing
Install the Server Components
Install the Client Components
Install Add-On Components
Hotfixes
Implementation
Implement EDD
Implement EDM
Implement PIA with DbCapture
Administration
Logs
Vault
Styling
Translations
Web-Services
Upgrade
Upgrade Server Components
Upgrade Client Components
Enhancements
Request an Enhancement
Usage
How to use EDD
How to use EDM
How to use DbCapture
Troubleshooting
EDD
EDM
PIA
Implement EDD
Now installed, you can Implement EDD.
Assumptions
• The installation has been completed and the post installation check list has been satisfied• Engineer has familiarity with Sage X3’s reporting functions
• Engineer has expertise using Crystal Reports and previous experience adding new content to reports such as text boxes and formula
• It is recommended in the interest of the environment wherever possible, emailing is the preferred method of transmission
Solution Overview
EDD allows single or multiple transactions to be delivered from reports generated by Sage X3.
If EDM is also installed, these documents are archived against the transaction and an audit archived with details including method of distribution in a separate table.
Print any of the supported transactions to the pre-configured destinations and EDD does the rest.
For this process to work successfully it is necessary to embed the appropriate directives in the document by editing the Crystal Report definition. R14 overhauls and streamlines this process making it much easier than previous releases:
• A single generic formula can now be used for any report and any Sage object
• No web-service lookups are required
• An unlimited number of To, CC, BCC and reply addresses can be used
• No need for a ‘special’ AUTO report, use your existing reports
• No need for an archiving definition
The following instructions provide sample formula definitions which you can just copy and paste.
Example:
• A batch of 50 Sales Invoices are printed to the AUTO destination
• The Crystal Report engine generates a PDF version of these 50 Invoices into 1 PDF and it’s copied to the \EDDOUTBOUNDMANAGEMENT\!AUTO dir shared on the V1 Server
• The script to do this is XV1SPEARC and added when the Endpoint is patched.
• This area is periodically polled, when picked up, the file is chopped up in to individual documents are sent either via email, fax or printed (depending on which value are found) to the pre-designated printer for Sales Invoices.
Another example:
• A batch of 100 Statements are printed to the EMAILONLY destination
• The Crystal Report engine generates a PDF version of these 100 statements into 1 PDF and it’s copied to the \EDDOUTBOUNDMANAGEMENT\!EMAILONLY dir shared on the V1 Server
• The script to do this is XV1SPEARC and added when the Endpoint is patched.
• This area is periodically polled, when picked up, the file is chopped up in to individual documents are sent either via email and not added to EDM. If no email is found, they are printed to the pre-designated printer for Statements.
Set the Destination Values in Sage
Q: What is a Destination?
A: A Destination in Sage X3 where EDD is concerned relates to its behaviour.
1. Go to Setup / Parameters > Destinations > Destinations (GESAIM)
2. Click on each of the Destinations with a description containing ‘[EDM]’ and for each, click the magnifying glass in the Server cell. This should bring in the default print server.
3. Click Save.
The above is all you have to do, below explains each area:
Active
Tick the box to activate the destination
Access Code
Optional, to assign a specific user to trigger the process
Output Type > Archiving
Indicating it is used in conjunction with EDD / EDM
Destination File
Leave blank
Server
The print server to use to serve the request for
Export Format
Destination Behaviour
ARCHIVE - Just archives a pre-existing Sage X3 transaction and does not distribute it.
AUTO - Distributes a document automatically deciding whether to email, fax or print it in that order
EMAIL - Forces the emailing of a document where found, archives it and prints if no email found.
EMAILONLY - Forces the emailing of a document where found, does not archive it and prints if no email found.
FAX - Forces the faxing of a document where found, archives it and prints if no email found.
FAXONLY - Forces the faxing of a document where found, does not archive it and prints if no email found.
PRINT - Forces the printing of a document where found, archives it.
PRINTONLY - Forces the printing of a document where found, does not archive it.
Formula Requirements explained
Previous versions of EDD required a unique formula for every report.
This can be quite time consuming and difficult to maintain.
EDM for Sage X3 now has a single formula consisting of stock fields.
These fields must be defined in the order they are explained below.
All fields are mandatory, they MUST exist in the formula on the report even if they’re empty and aren’t to be used.
All field content can be obtained either from a lookup, or hard coded, depending on your requirements.
SAGEENDPOINT
The Sage Endpoint, this is populated using the X3DOS parameter.
OBJECTNAME
This is the 3 letter Sage Object to be distributed and must be manually confirmed per report, so for a Sales Order SOH, a Sales Invoice SIH and so on.
TRANSACTIONNUMBER
This is obtained by looking up the transaction as it appears in the left list for the object, e.g. {SINVOICE.NUM_0}
TOEMAIL
If emailing is the preferred method of distribution, the To Email address.
A ; separator can be used for multiple To addresses and can be obtained by either a formula, e.g. {BPADDRESS_BPR.WEB_0} or typed in, e.g. accounts@domain.com
CC_EMAIL
The CC Email address (where applicable).
A ; separator can be used for multiple CC addresses and can be obtained by either a formula, e.g. {BPADDRESS_BPR.WEB_1} or typed in, e.g. accounts@domain.com
BC_CEMAIL
The BCC Email address (where applicable).
A ; separator can be used for multiple BCC addresses and can be obtained by either a formula, e.g. {BPADDRESS_BPR.WEB_2} or typed in, e.g. accounts@domain.com
REPLYEMAIL
The Reply Email address (where applicable).
Only a single Reply address can be used. It can be obtained by either a formula, e.g. {BPADDRESS_BPR.WEB_3} or typed in, e.g. accounts@domain.com
FAXNUMBER
The Fax Number (where applicable).
Only a single Fax Number can be used. It can be obtained by either a formula, e.g. {BPADDRESS_BPR.WEB_2} or typed in, e.g. 0161123456
PRINTER
The path to the networked printer, e.g. \\PRINTSERVER\PRINTERSHARE.
If this is not populated for a document, it must still exist, but must be a blank value.
The default Transactional printer is used as per the one defined during the setup process, the document is moved to the EDM Print Management Service
BPNAME
Obtained using a formula, the Business Partner plain English name, e.g. {BPARTNER.BPRNAM_0}
BPCODE
Obtained using a formula, the Business Partner code, e.g. {BPARTNER.BPRNUM_0}
TRANSACTIONVALUE
Obtained using a formula, the total value of the transaction, e.g. cstr({SINVOICE.AMTATI_0},"#######.00")
TRANSACTIONDATE
Obtained using a formula, the date of the transaction, e.g.
cstr({SINVOICE.ACCDAT_0},"dd/MM/yyyy")
BPLANG
Obtained using a formula, the language the BP is set as in Sage. Where the translation exists, they will receive their email content in that language e.g. ~~@[BPLANG:"+{BPARTNER.LAN_0}+"]
TRANSACTIONCOMPANY
Obtained using a formula, the company the transaction belongs to, e.g. {COMPANY.CPYNAM_0}
TRANSACTIONSITE
Obtained using a formula, the Site the transaction belongs to, e.g. {FACILITY.FCYNAM_0}
TRANSACTIONDEPT
Obtained using a formula, the Site the Department belongs to
SALUTATION
The farewell at the footer of the email
KNOWNAS
Rather than 'Accounts Team', replace it with the name of the individual the email is to be sent too
FROMADDRESS
The From Email address for this report
SOURCEDOCUMENT
The document that this report links to, i.e. the Order to the Invoice, e.g. {SINVOICEV.INVREF_0}
EMAILSUBJECT
If added, overrides the subject line provided as standard.
SHOWEMAILTABLE
If set to 0, removes the table containing a summary of email content, if set to 1, includes it.
EMAILFONT
Sets the font face and size of the email text seperated by a pipe symbol, e.g. Arial|10
LOGO
Adds a logo to the footer of the email, this must be the absolute URL, e.g. http://mycompany.com/images/mylogo.png
EMAILSIGNOFF
Rather than 'Yours sincerely', replace it with a sign off to your preference
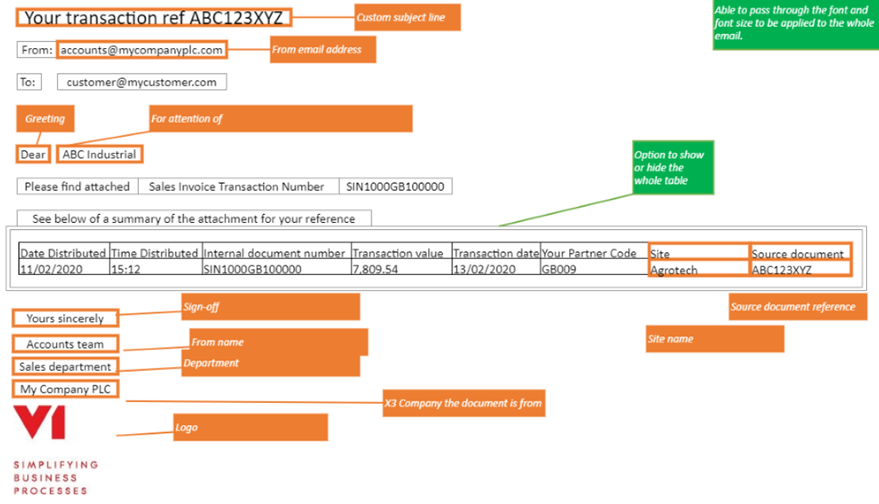
Here is an example of what your email will look like based on the above formula examples, more detail in the Release Note:
Crystal Report Changes
As per the Formula Requirements definition, the following steps cover the addition to a report you wish to use in conjunction with EDD.
A sample report has been provided for you (XV1_SBONFACAUTO) which was applied as part of the patch installation.
This gives examples of how the formula can be used and can be used for basic testing, but should not be used for a live customer.
• Take a backup of your Crystal Report
• Open your report in Crystal Reports
• Click View > Field Explorer
• Right click on Formula Fields and click New …
• Give it a name of XV1TAGS and click OK
• Now in your list of Formula Fields, scroll down to it, ensure it has a green tick on it (to indicate active)
• Single click on it, then drag it into the Group Header #2b section of the report
• Extend it so it spans the full width of the page, but not as to overlap any other fields, and is the same height as the other text fields
• Right click on it and click Format Field …
• Click on Font
• Set the Size to 1 (you will have to type this)
• Set the Color to red when testing (so you can see the result of the formula) and to white when ready to go live.
• Click OK
When white, this means the formula is essentially invisible (white on white) and very small so again as not to impede any other formula already on the report.
Sample formula
Now the Formula Field is in place and formatted, it needs content to trigger and populate data for the document distribution.
In the Field Explorer, right click on XV1TAGS and click edit
Below is an example based on SIH (Sales Invoices) and the SBONFAC report.
Only change the text after the colon in each field, either a formula or hard coded text, based on the field you’re editing.
Ensure the structure of it remains the same as below and is in the same order.
Ensure there are no spaces in any part of the formula.
All formula must be added even if they’re not to be used.
You need to make sure the formula is all on one line, if it spills on to multiple lines, this can cause duplication issues with the splitting of documents.
For your convenience, click the button below to copy a sample formula to your clipboard.
NOTE: EDD is extremely flexible, it is not possible to provide an 'out the box' formula with content, but this sample should provide enough to pursue one based on the requirements of the customer.
Copy
Formula Suppress
To ensure the XV1TAGS formula only appear on the first page of a multipage document, you need to format the field on the report to set the Suppress property if the page number is greater than 1.
• Right click on XV1TAGS in the Formula Field list and click Edit …• Expand Formatting Formulas menu > Group Header #2 and reflect below:
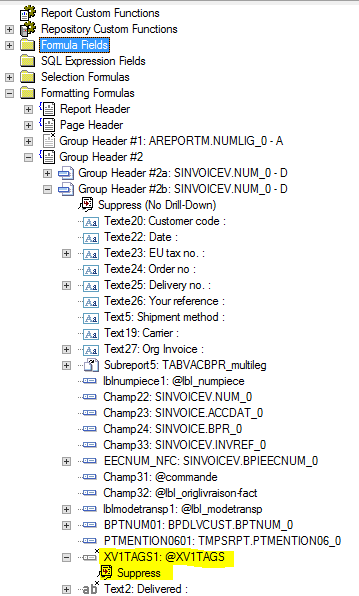

• Click Save and Close. Your report is now ready to use in conjunction with the standard EDD functionality.
EDDOUTBOUNDMANAGEMENT.def
This is the central script handles all methods of distribution via EDD.
In it's header are a number of options that can be set based on your requirements that you can change just be editting the file.
C:\V1\EDDOUTBOUNDMANAGEMENT\EDDOUTBOUNDMANAGEMENT.def
NOTE: The setup program sets these values based on defaults, but it's a good idea to familiarise yourself with them in-case requirements mean change.
VARIABLE = MODE,,"EDM"
VARIABLE = ALERT,,"1"
VARIABLE = USERSTOINFORM,,"APDEPT"
VARIABLE = ATTACHFAILEDDOCS,,"3"
VARIABLE = MAXATTACHMENTSIZE,,"10"
VARIABLE = CLEANUPROCESSED,,"1"
VARIABLE = AGECHECK,,"7"
VARIABLE = SENDAUDIT,,"1"
VARIABLE = SENDAUDIT_EMAIL,,"admin@wearev1.com"
Post Implementation Checklist
Yes, it’s another checklist, but it will save you a lot of time debugging if you quickly run through these few points:
• Have you previewed your report and the formula is all on one line?
• Does miscellaneous table 902 contain the required V2 document types you want to use?
• Are your archiving rules present? (GESARC)
• For each of your archiving rules, is the right report code set?
• For each of your archiving rules, is the Document type set?
• Is the EDD Outbound Management service running?
• Is the EDM Print Management service running?
• Are the details at the header of the \EDDOUTBOUNDMANAGEMENT.def correct?
• Have you correctly shared the printer you want to use and checked it’s PDF enabled?
• Is your mail server correctly configured to allow relaying?
• Have the ITDEPT and APDEPT DbLogin users been given email addresses?
If you’ve followed all the steps in this document correctly and the above checks have passed, you should now be good to go.
You are strongly advised to go through a period of testing using multiple scenarios using internal email addresses, i.e. temporarily change the email addresses for your Customers / Suppliers.
Non-Mandatory Implementation Steps
The previous chapters are compulsory to ensure a functional system, however there are some steps that are optional.
You’re advised to familiarize yourself with the following should the customer have requirements beyond the ‘out the box’ functionality.
Configure Printers per Sage user
The standard installation will configure both barcode and transactional printers for day to day usage for those outbound documents that may require printing.
Very often this is all that’s required, however larger customers may wish to configure printers for individual users.
1. Navigate to C:\EDMR14, right click and run setup.exe AS ADMINISTRATOR
2. Select the Server Installation radio button and click Next >
3. An existing Server Installation is detected and you’re given several options, select Manage printers per Sage User and click Next >
4. Where prompted, enter the Sage user (Sage user, not Syracuse user) as it appears in Sage
5. Confirm the desired location of the Transactional Printer for this user
6. Confirm the desired location of the Barcode Printer for this user
7. Click Apply
Technical Detail
A simple ini file is created beneath the C:\V1\EDMPRINTMANAGEMENT dir matching the user setup, so a PETE Sage user would have a PETE.ini file.
This contains the path to both the chosen transactional and Barcode printers.
When an outbound destination is triggered, the PDF is split and printing is done in this priority:
• If the report passes a printer, this takes priority
• If the report doesn’t have a printer and a USER.ini exists, this is used
• If neither the report has a printer nor no USER.ini is found, the default is used as per the initial setup.