EDM for Sage X3
Installation
Pre-requisites
Licensing
Install the Server Components
Install the Client Components
Install Add-On Components
Hotfixes
Implementation
Implement EDD
Implement EDM
Implement PIA with DbCapture
Administration
Logs
Vault
Styling
Translations
Web-Services
Upgrade
Upgrade Server Components
Upgrade Client Components
Enhancements
Request an Enhancement
Usage
How to use EDD
How to use EDM
How to use DbCapture
Troubleshooting
EDD
EDM
PIA
Implement EDM
Now installed, you can Implement EDM.
Assumptions
• The installation has been completed and the post installation check list has been satisfied• You have physical access to the V1 Server where the installation was performed (via remote desktop / equivalent dial in capability)
• The DbLogin Admin Console has been installed on the V1 Server
File Transfer Overview
EDM for Sage X3 is designed to work on either an ‘On Premise’, ‘Hosted’ or ‘Cloud’ based infrastructure, with no functional differences.
• EDD triggers the creation of outbound reports as PDF’s and distributes them
• EDM triggers the archiving of transactions, attachments or printing of barcodes
• PIA triggers creation of transactions in Sage
All of these activities move files from server to server, PC to PC, device to device.
You have two options for transferring files from the Sage X3 server to the V1 Server and vice versa:
Option 1
Disk
Files are copied from one server to another via a network share.
This is the standard implementation, best suited to on premise or hosted deployments where the two servers (Sage Application server and V1 Server) can see one another over a network.
Option 2
Syracuse is used to email files (SYRAMAIL) from the Sage X3 server to the V1 Server, the file is downloaded by V1SmartMail and processed as normal.
This is the non-standard implementation, best suited to a Cloud based implementation where the two servers (Sage Application server and V1 Server) cannot see one another over a network.
These options are controlled by a single parameter in Sage X3 called EDMARCTYPE.
This guide will explain this parameter, take you through option 1 as standard and option 2 as none standard allowing you to choose which method is best for your implementation.
Import Links
EDM introduced document linking so when viewing a document in SmartRetrieve, if available, you will be given the option to see any attachments that relate to one another.
Example
• A Purchase Invoice has been created using PIA, the transaction is in Sage and the image archived against it
• AP user PETE receives 3 photographs that relate to the Invoice and archives them using the [EDM] Archive Attachment facility
• AP user PETE receives an email attachment for the Supplier so archives it using the Supplier Archive EDM table using SmartDeposit
Usage
• PETE wants to see the Invoice, the photographs he archived and the Supplier email
• When on the Purchase Invoice transaction, clicks the [EDM] View Transaction (s)
• Viewing the image, selects the link to see the attachment
• From the attachment, selects the link to see the email attachment
Procedure
1. Open the DbLogin Admin Console and login as administrator / administrator
2. Click the DbArchive Import/Export (pen-drive with 2 blue arrows on it) icon at the top of the screen
3. Click File > Show system tables
4. The _LINKS table will now be displayed, single click on it
5. Click the Import icon at the top of the screen
6. Navigate to the \V1\DbArchive directory, click on the _LINKS.csv file and click Open
7. The links are now loaded, close the Import / Export Tool
8. To ensure they’re ready to use, click the DbArchive Link Editor icon (green arrows with a lightning strike through it) to load the Link Editor and you will see a list of all standard links pre-created.
More links can be added at any-time.
Create the V1Documents database
To streamline the number of databases used by EDM for Sage X3 R14, this single database will house all the user data.Future releases will extend on this also housing the DbArchive data, but for R14, this remains in its own database as initialized by the setup program.
1. Open the SQL Management Console
2. Connect to the same instance as used by the setup program
3. You should see the DbArchive database, create a new database at the same level called V1Documents
a. Where you have allocated a specific user (i.e. V1USER) assign the relevant permissions to your new database
Close the SQL Management console, no further action is needed.
Configure V1 Smart Suite
The SmartSuite is the term given to the suite of programs in the EDM solution allowing the depositing and retrieval of documents from the database.
Now installed, it must be configured. Although this can be done from anywhere with http access to the V1 Server where the software was installed originally, you are advised to do it from the same one.
NOTE: You will need the SQL Server / Instance name, sql user and password you used to install EDM for this section.
NOTE: Ensure the SQL Server service is running applicable to the database location prior to starting configuration.
1. Open your web-browser of choice
2. Navigate to http://127.0.0.1:5002
3. The ‘first run’ config screen appears
4. Click OK
5. In the Archive JSON Configuration, again change the server name to the name or IP address of the server you are installing on
6. Scroll down to the jdbc connection (SmartRetrieve search indexing), remove the example. This value should be the SQL instance name where EDM has been installed, a ; then Database=DbArchive
NOTE: An Example would be jdbc:sqlserver://MYSQLSERVER\SQLINSTANCE;Database=DbArchive
7. Enter the same user and password you entered in the setup program
8. Click Test JDBC connection until you see a green tick
9. Click the Data Handling tick box ensuring STRING fields are handled as UTF-8
10. Scroll down to the jdbc connection (V1 document server), remove the example. This value should be the SQL instance name where the V1Documents database has has been installed, a ; then Database=V1Documents
11. Enter the JDBC connection string to connect to the SQL server where the V1Documents database was created, an example would be:
jdbc:sqlserver://MYSQLSERVER\MYSQLINSTANCE;Database=V1Documents
Change the text in red as applicable to your actual environment.
12. Enter the Database connection user
13. Enter the Database connection password
14. Click Test JDBC connection, where successful, you will see a green tick
15. In the License server section, click Test connection
16. Scroll to the bottom of the screen and click OK
17. You should now see a login screen, this is an indication everything is good to go. Login as an Adminitrator user.
18. Again, change the url from http://MYSERVER123:5002/portal to http://MYSERVER123:5002/config and press enter
19. Click Configure integration server
20. Scroll down until you see 'Other configuration' and click 'Import user from DbLogin'
21. Scroll to the bottom and click OK
22. Go to User Management > Manage Users, you should now see all your existing DbLogin users
23. Click the pencil for each one and un-tick 'must change password' or they will be forced to when they come to login
Create Your Role(s)
Q: What us a role?
A: A role is a permission level to permit access to particular areas of the SmartPortal, such as access to a SmartExtract queue, ability to train and export documents etc ...
They are created / administrated in the V1SmartPortal and usually by an administrative user and can be created at any time.
An admin role has been created for you to 'get you going' but you are advised to create others as applicable to day to day usage you can apply to users.
1. Log in to the V1SmartPortal
2. Click on User management > Manage roles
3. Click Add role
4. Give the role a meaningful name, such as APDEPT
5. Tick the boxes are per the on screen instructions to fit the role you are creating
6. When done, click Save
Create Your User(s)
A DbLogin user is one that requires access to the V1 clients and SmartSuite on a day to day basis.
This might be to login to the SmartSuite to use SmartDeposit and deposit a document, or to login to DbCapture Admin to view the queue of documents in PIA.
A DbLogin user is the equivalent of a Sage user (NOT a Syracuse user), so a Sage user called PETE would need a corresponding DbLogin user called PETE to use the software.
Ensure you know the details of the Sage users (remember, those in the (GESAUS) function, NOT Syracuse users) who wish to use EDD / EDM / PIA for each Sage Endpoint.
These users can be added at any-time, but for the purposes of this document, you’re advised to create as many as possible as early in the implementation as possible.
1. Log in to the SmartSuite as an administrative user
2. Click on User Management > Manage users
3. Click on Add user
4. User Type = DbLogin User
5. User name = Choose a username
6. Add Forname
7. Add Surname
8. Add email address
9. Password = Choose a password
10. Confirm password
11. Role = admin
12. Ensure Must Change Password is UN-ticked
13. Click Save
NOTE: When creating users, make sure they are in UPPERCASE
Repeat these steps for each user required
Configure Drilldown User
EDM for Sage X3 has the concept of a specific drilldown view for those users that only want to view images from with Sage, i.e it will only display the image rather than other options you may require as an external user.
You are advised to create a dedicated ‘drilldown’ DbLogin user who sole job will be to authenticate this action.
Following the above instructions Create Your DbLogin Users, create a dedicated user called DRILLDOWN.
Configure Users
EDM for Sage X3 has the concept of named licensing.
Now you’ve created your users, similar in principal to badges in Sage, it means they can guarantee having access to certain V1 applications.
1. Open the DbLogin Admin Console and login as administrator / administrator
2. Click the padlock icon at the top of the screen, Manage Access Tokens
NOTE: Here you will see a grid (based on your licenses applied during the installation) what applications have been licensed for.
3. Click on the first application in the list and click Allocate
4. Click on the DbLogin user on the left you wish to assign access
5. Click the >> arrow to assign them access to the software
6. Click Save
7. Repeat the above steps for each application in the list based on the values you see
8. Select your DRILLDOWN user, select the SmartRetrieveERP application and assign the maximum number in your pool
9. When finished, click Close
Adding DbLogin users to authentication Database
EDM R13 introduced a new, cleaner way to administrate DbLogin user access to Sage Endpoints, R14 continues this theme.
Q: What does this actually mean?
A: Access to a Sage Endpoint means when using SmartDeposit you can add a document, when using SmartRetrieve you can see a document, or when using PIA, you can see the queue of Documents for that Endpoint.
It’s basically an extra level of security meaning the right users only have access to the right data. i.e. you only want your users in the Birmingham office using the BIR123 Endpoint
You have 2 options to do this, automatically, or manually.
Option 1
Automatically manage user access using the FilterMapMaintenance optional EDM Add-on.
This is best suited to large customers who have lots of users who's access needs regular maintenance / may come and go regularly.
Option 2
Manually manage users.
This is best suited to smaller customers or those that rarely have a requirement to change user access once it's been initially assigned.
1. Navigate to C:\EDMR14, right click and run setup.exe AS ADMINISTRATOR
2. Select the Server Installation radio button and click Next >
3. An existing Server Installation is detected and you’re given several options, select Manage Sage Endpoint Accessibility and click Next >
4. Sage is interrogated to retrieve all Sage Endpoints. At this point, either choose to configure access to All Endpoints (which is advisable if you’re doing this for the first time) or select the one you wish to configure access to. Click Select.
You now have 2 panels.
The panel on the left are those DbLogin users which at this point, have no access to the Endpoint selected
The panel on the right are those DbLogin users which at this point, have full access to the Endpoint selected
5. Using the arrows, move your DbLogin users from left to right (or all together using the double arrow) to give those users access to the corresponding Endpoint.
6. When satisfied, click Save to commit to the authentication database.
7. When satisfied, click Close and close the installer.
Q: What if I click Save and get a connection error / can’t connect?
A: If the connection details have been changed since the original install, you will experience a problem connecting.
On the server where EDM is installed, open the registry and navigate here:
HKEY_LOCAL_MACHINE\SOFTWARE\Wow6432Node\EDMR14
Ensure the details in the DBARCHIVE_* keys reflect the server where the DbArchive database is installed / change where appropriate and try again.
Technical Detail
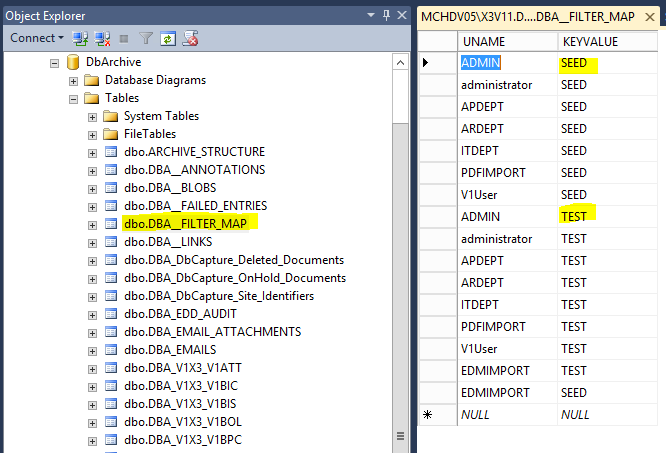
The EDM database (DbArchive) contains a table called DBA__FILTER__MAP.
This table hold 2 fields:
UNAME
KEYVALUE
The UNAME is the DbLogin user
The KEYVALUE is the Sage X3 Endpoint
These values dictate which Sage Endpoints a DbLogin can use when using the day to day components such as Smart Deposit and the DbCapture Client.
So when using the setup program and pressing the ‘Save’ button, all you’re doing is updating this table.
Although not recommended, you don’t even have to use the setup program. If you have a stored procedure / preferred method to populate this table, then feel free to use it.
Setting Parameter Values in Sage
The following tasks should be performed on the server where EDM has been installed, whether a standalone server, or on the Sage Application Server.
• In our example, the Endpoint is SEED, this procedure needs to be repeated for EVERY Production endpoint that wishes to use EDM, change as appropriate
• In our example, the server IP address or hostname where EDM has been installed is MYSERVER123, change as appropriate
1. Make sure you are logged in to the SEED Endpoint
2. Go to Setup / Parameters > General Parameters > Parameter Values (ADPVAL)
3. In the Module / Chapter cell, enter ADX and press tab
4. Click the action button to the left of the ‘EDM connector’ entry and click details
The grid below explains in detail every parameter and the options available to you during implementation.
| Parameter | Description | Value options to set |
| ARCDIR | A legacy path to the temp area of the server. Although not used now, must still be set to preserve some EDD functionality. | C:\temp |
| ARCMAC | The Host Machine from legacy versions of EDM. No longer used and no value is required. | N/A |
| ARCROOT | The Archive URL root address from legacy versions of EDM. No longer used and no value is required. | N/A |
| ARCROOT2 | The Archive URL root2 address from legacy versions of EDM. No longer used and no value is required. | N/A |
| ARCURL | The Archiving URL address from legacy versions of EDM. No longer used and no value is required. | N/A |
| ARCV1DIR | A legacy path to the temp area of the server. Although not used now, must still be set to preserve some EDM functionality. | C:\temp |
| EDDFOLDER | The UNC path to the EDDOUTBOUNDMANAGEMENT directory on the V1 Server. Only required if the EDMARCTYPE is Disk. | \\MYSERVER123\eddoutboundmanagement |
| EDDMB | Where the EDMARCTYPE is Email, the mailbox to receive files that are then distributed via EDD. | edd@mycompany.com |
| EDMARCMA | Where the EDMARCTYPE is Email, the mailbox to receive files that are then archived as attachments via EDM. | edm_attachments@wearev1.com |
| EDMARCMF | Where the EDMARCTYPE is Email, the from address from where emails sent are received. | admin@mycompany.com |
| EDMARCMT | Where the EDMARCTYPE is Email, the mailbox to receive files that are then archived as transactions via EDM. | admin@mycompany.com |
| EDMARCTYPE | If you are on premise or a hosted environment where the Sage Application and V1 Server can see one another over a network, set to Disk. If a Cloud or infrastructure where the two servers cannot see one another, set to Email ensuring the mailboxes are setup accordingly. | Disk |
| EDMBCPMB | Where the EDMARCTYPE is Email, the mailbox to receive files that are then printed as barcodes via EDM. | barcode@mycompany.com |
| EDMCONN | Depending on whether the connection to EDM is via http, or https, select the appropriate value. | HTTP HTTPS |
| EDMIMP | The UNC path to the EDMIMPORT directory on the V1 Server. | \\MYSERVER123\edmimport |
| EDMLINK | Set this to 1 if you wish to have the [EDM] View Transaction or [EDM] View Attachments links check EDM for the existence of a file. If not found, the links will be greyed out to benefit the user experience. | 0 1 |
| EDMMAILMAX | The maximum size of an attachment in megabytes. | 5 10 25 50 |
| EDMSERVER | The IP address or DNS of the V1 Server. | MYSERVER123 |
| EDMSERVER | A legacy path to the temp area of the server. Although not used now, must still be set to preserve some EDD functionality. | C:\temp |
| EDMTYPE | Set this to 1 to use SmartRetrieveERP mode and have a requirement for a web-login. Set it to 2 to use the EDM User profile credentials whose username and password are passed as part of the click of the link. Setting it to 2 means the associated Sage user must have an EDM User Profile assigned and that in turn must have the DbLogin user / pass. | 1 2 |
| XV1EDMWSP | A legacy value dictating the name of the Classic Pool alias for a given endpoint. Although not used now, must still be set to preserve some EDM functionality. | X3EDMSEED |
| INVSITE | In conjunction with PIA with SmartExtract or PIA for DbCapture, set to 1 to return Purchasing Sites, set to 2 to return Invoicing Sites in the Site Code Dropdown. | 1 2 |
| NISURL | The base URL of the V1NodeIntegrationServer. Browsing to this in your web-browser should display the list of API's available. | http://MYSERVER123:5002/api |
| POHSIGCHK | In conjunction with PIA with SmartExtract, set to 0 to not check for signature management. Set to 1 to check for and accomodate signature manangement. | 0 1 |
| WEBURL | The base URL of the V1WebPortal. Browsing to this in your web-browser should prompt you to login to the V1 WebPortal. | http://MYSERVER123:5002 |
5. Once you’ve set your values, Click OK and return the Parameter Values screen
6. Click Save to commit the settings
7. Click Close Page
NOTE: Do not put quotes or have spaces in any of the above paths.
Add the Drilldown, Archive and Print Barcode Links in Sage
A drilldown is a means to view an archived image from within the Sage object to which it relates.
They are completely optional, you can add as many or as few as per the requirements.
There are 3 drill downs as standard, 1 for the latest transaction (assuming there are say 3 versions of 1 document, just view the latest one) (such as a Purchase Invoice created by PIA) and 1 for any attachments to those transactions archived using SmartDeposit via the Transactional Attachments table for instance.
[EDM] View Latest Transaction
[EDM] View Transaction(s)
[EDM] View Attachment
When either is clicked, it will launch SmartRetrieve and you will see any images archived against that object.
There are also 2 links to archive adhoc files, again 1 against the transaction 1 as an attachment to it.
[EDM] Archive Transaction
[EDM] Archive Attachment
When either is clicked, it will prompt you to drag and drop any file which is then automatically archived against either the transaction or attachment respectively as a background task.
NOTE: In the majority of browsers, popups are initially blocked. Ensure the first time a link is clicked, you ‘allow’ popups from the Sage Server.
The final link is to print a barcode, directly from the object. When affixed to the paper copy of the document and scanned using DbScanner, is then indexed and viewable via the transactional drilldown.
[EDM] Print Barcode
The following must be repeated for each Sage Endpoint patched for EDM.
Change as appropriate for those objects you wish to add the capability.
This can be time consuming, so you are advised to ask the customer which documents they intend to use on a day to day basis and only activate those. Any further activations can be done on an adhoc basis.
As per the following instructions, most window codes are an O (the letter) followed by the object name, so OPIH for Purchase Invoices, OSIH for Sales Invoices and so on.
Where applicable, the associated entry transaction must be re-validated to activate the link.
Below is just an example of the PIH object (a very common one to use) use the table it follows as reference for additional objects and the Entry Transactions.
1. Log in to the Sage as ADMIN (or equivalent user)
2. Change your Sage Endpoint to SEED
3. Navigate to Development > Script Dictionary > Windows (GESAWI)
4. In the Window cell at the top of the screen, enter OPIH and press TAB (O the letter not the number)
5. Click the Button/Menu tab
6. Scroll to the bottom and double click in the first available blank cell, reflect the below:
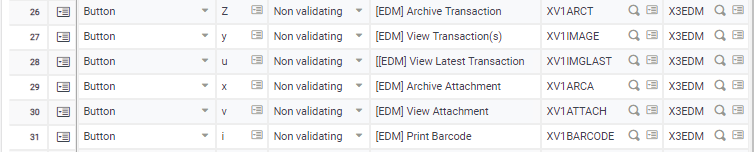
7. When completed, click Save, then Validation
NOTE: Regardless of object, ensure:
[EDM] View Transaction is given a y code and
[EDM] View Attachment a v code
To ensure they glow / dim depending on the availability of a document.
NOTE: The 'Button Text' can be anything you like.
Revalidating the entry transactions
Once links have been added to a Window, where applicable, the Entry Transaction that wishes to use them must be re-validated.
Using the table below for reference, it shows you the Sage X3 Object, the window supported and where applicable, which menu in Sage is the Entry Transaction.
For each found and where the link is required, select it in the left list and click Validation on the right.
Create the REST connection to activate [EDM] View Latest Transaction
As part of on-going enhancements to the solution, a new drilldown has been added allowing the latest document to be viewed. This requires connectivity to the V1 server via REST to talk directly to the API supporting this feature.
1. Log in to the Sage as ADMIN (or equivalent user)
2. Change your Sage Endpoint to SEED
3. Go to Administration > Web services > REST webservices
4. Click on New REST web service
5. Where prompted, give it a name of V1LoginDrillDown
6. Where prompted, enter the base url of the V1 server adding :5002/api/ on the end, so for example http://MYSERVER123:5002/api/ (browsing to this URL should present a list of API's. NOTE: Must include trailing slash.)
7. Ensure Content Type is JSON
8. Ensure Authentication is None
7. Click on TEST Get, if you get an OK response, assume everything is good to go, click Save
Final Mandatory Standard Implementation Steps
Before use, it is a good idea to do a final rebuild if indexes and restart all services to ensure the system is ready for use.
• In our example, the server IP address where EDM has been installed is MYSERVER123, change as appropriate
1. In your web browser of choice, browse to http://MYSERVER123:5002
2. Login as administrator / administrator
3. Change the url from http://MYSERVER123:5002/portal to http://MYSERVER123:5002/config and press enter
a. This is a back door to the config and not exposed for general use
4. Click Configure integration server
NOTE: Once you have archived your first document either via EDM or PIA, you must carry out the following step in order to see images in SmartRetrieve.
5. Scroll down about half way and click the button ‘Rebuild all search indices’
6. Nothing will apparently happen, but no errors assume a successful rebuild.
You’re ready to go!
Non-Mandatory Implementation Steps
The previous chapters are compulsory to ensure a functional system, however there are some steps that are optional.
You’re advised to familiarize yourself with the following should the customer have requirements beyond the ‘out the box’ functionality.
Configure DbLogin Alerts
Out the box, several DbLogin users are added so the system can be used immediately, however there are some minor additions needed.
EDM has the concept of alerts informing users of any issues or activity for their attention that may arise during day to day usage of the software.
ITDEPT
This represents the I.T department / individual responsible for monitoring alerts.
1. Open the DbLogin Admin Console and login as administrator / administrator
2. Click the blue / green icon at the top, ‘User Details’
3. Click ITDEPT, click Edit
4. Enter an Email address for the internal I.T Department. They are informed via email serious alerts / errors if seen during day to do usage of the system.
5. Click Update
Configure User Access to Document Types
Example:
• I want to limit my user PETE to only have access to Purchase Orders
1. Open the DbLogin Admin Console and login as administrator / administrator
2. Click the permissions icon at the top of the screen
3. Click the green plus icon at the top of this screen
4. Give your access level a meaningful name, i.e. ACCESSPURCHASEORDERS, click OK
5. The default access is nothing. To enable access to Purchase Orders, click the Purchase Orders Cell and click the green circle icon at the top of screen
6. Notice the status now changes to Full, now click the save icon at the top of the screen
7. Repeat the above steps per access level you wish to add per document type
8. Close the DbArchive Access Permissions Editor
9. From the grid, select the checkbox next to the PETE user and click the icon at the top of the screen
10. In the component tree, single click DbArchive
11. In the right hand panel, notice a drop down for Value of Access level. Select the drop down and click ACCESSPURCHASEORDERS which should be in the list. Click Save
Repeat the above steps per user per access level you wish to create
Activating FTS
SmartRetentions for V1 Document Management gives users control over the handling of document deletion, both manually and automated.
SmartRetentions will aid users to fulfil their obligations regarding personal data retention as determined by the GDPR regulations.
An optional enhancement of SmartRetentions is the EDM database has Full Text Search enabled.
This means the content of a document is read as a background task using the ABBYY OCR Engine, can be searched on and therefore found using normal SmartRetrieve wildcard search or as part of a rule in SmartRetentions.
FTS is an optional, chargeable addon and you’re advised to discuss it with your Sage or V1 Account Manager prior to implementing.
To apply it to your EDM solution whether as a new installation or retrospectively:
1. Navigate to C:\EDMR14, right click and run setup.exe AS ADMINISTRATOR
2. Select the Server Installation radio button and click Next >
3. An existing Server Installation is detected and you’re given several options, select Add FTS capability to EDM and click Next >
4. When prompted, browse to the path of your licenses
5. Where found, the Install button activated
6. Click Install
NOTE: As FTS needs ABBYY installed and as PIA / SOA already use ABBYY, if found, it will use the existing installation. If not found, ABBYY will be installed automatically. If so, follow the instructions as per PIA with DbCapture to activate it.
7. The ‘DbArchive: FTS Indexing’ service is installed, activated and relevant settings added to dbarchive.ini
8. Click Close
No further configuration is required, images are retrospectively indexed if added to a legacy archive and from now on to a new installation.
Configure V1 SmartMail
Where the EDMARCTYPE Sage X3 ADX parameter has been set to Email, the associated configuration to facilitate is as follows:
Assumptions:
• You must be logged on to the V1 Server where the Server installation has been performed
• The EDM installation is under C:\V1
• You have access to the mail server you intend to use and the capability to create / administrate mailboxes. Have the credentials to hand.
• As an example, your domain is mycompany.com. Change as appropriate.
• The Inbound mailbox has already been configured as part of the standard implementation guide
Pre-Requisites
• Create the following mailboxes on your mail server of choice:
• edd@mycompany.com
• edm_transactions@mycompany.com
• edm_attachments@mycompany.com
• barcode_print@mycompany.com
These mailboxes are for internal use and should not be supplied to anyone outside your organization. They are used in conjunction with EDD and EDM.
1. Using File Explorer, navigate to C:\V1\Utils
2. Right click and run as administrator the start_services_debug_smartmail.bat (this starts the V1 Smart Mail service in debug mode).
NOTE: V1 Smart Mail can only be configured in debug mode to prevent erroneous usage
3. Open your Web Browser of choice and navigate to http://localhost:8444, this is the configuration screen
General Configuration
4. Set log mode to console and file
5. Set Log Level to log errors only
6. Set Store log file Audit to yes
7. Set Purge log files older the # days to 30
8. Using File Explorer, ensure the path to cscript.exe is correct
9. Set cycle mailBoxes to run continuously
10. Set poll time in seconds to be no lower than 30, 60 seconds or higher is advised
11. Click the dustbin icon to remove any sample Mail Servers
Add your inbound mailboxes
The following mailboxes all have a specific role and have been split accordingly based on what you are licensed to use.
Those for EDD and EDM are for Patch 2 onwards only and are used if direct disk access is not permitted from the Sage Application server to the V1 Server to transfer files.
12. Click the dustbin icon to remove any sample mail boxes
13. EDD
13.1. Click the Add new Mailbox icon to a new mail box
13.2. Add an identifier of EDD
13.3. Ensure the Server ID is the same as the one configured
13.4. Enter an email address of edd@mycompany.com
13.5. Enter the password to access this mailbox
13.6. Click the box Enabled
13.7. In the first dropdown, select EXTRACT as the action
13.8. Where prompted for File extensions, enter PDF
13.9. Supply an Attachment path of C:\V1\EDDOUTBOUNDMANAGEMENT\SmartMail
13.10. In the dropdown below, select DELMSG
13.11. Click OK
14. EDM
14.1.1. Click the Add new Mailbox icon to a new mail box
14.1.2. Add an identifier of EDM_TRANSACTIONS
14.1.3. Ensure the Server ID is the same as the one configured
14.1.4. Enter an email address of edm_transactions@mycompany.com
14.1.5. Enter the password to access this mailbox
14.1.6. Click the box Enabled
14.1.7. In the first dropdown, select EXTRACT as the action
14.1.8. Where prompted for File extensions, enter *
14.1.9. Supply an Attachment path of C:\V1\EDMImport\Transaction
14.1.10. In the dropdown below, select DELMSG
14.1.11. Click OK
14.1.12. Click the Add new Mailbox icon to a new mail box
14.1.13. Add an identifier of EDM_ATTACHMENTS
14.1.14. Ensure the Server ID is the same as the one configured
14.1.15. Enter an email address of edm_attachments@mycompany.com
14.1.16. Enter the password to access this mailbox
14.1.17. Click the box Enabled
14.1.18. In the first dropdown, select EXTRACT as the action
14.1.19. Where prompted for File extensions, enter *
14.1.20. Supply an Attachment path of C:\V1\EDMImport\Attachment
14.1.21. In the dropdown below, select DELMSG
14.1.22. Click OK
14.1.23. Click the Add new Mailbox icon to a new mail box
14.1.24. Add an identifier of BARCODE_PRINT
14.1.25. Ensure the Server ID is the same as the one configured
14.1.26. Enter an email address of barcode_print@mycompany.com
14.1.27. Enter the password to access this mailbox
14.1.28. Click the box Enabled
14.1.29. In the first dropdown, select EXTRACT as the action
14.1.30. Where prompted for File extensions, enter TXT
14.1.31. Supply an Attachment path of C:\V1\EDDPRINTMANAGEMENT\BARCODE
14.1.32. In the dropdown below, select DELMSG
14.1.33. Click OK
15. Click Save configuration at the bottom of the screen.
16. Close your browser
17. Go back to the CMD window you launched to start V1 SmartMail in debug mode, close the window
18. Open services.msc and start V1 SmartMail service.