EDM for Sage X3
Installation
Pre-requisites
Licensing
Install the Server Components
Install the Client Components
Install Add-On Components
Hotfixes
Implementation
Implement EDD
Implement EDM
Implement PIA with DbCapture
Implement PIA with SmartExtract
Administration
Logs
Vault
Styling
Translations
Web-Services
Upgrade
Upgrade Server Components
Upgrade Client Components
Enhancements
Request an Enhancement
Usage
How to use EDD
How to use EDM
How to use DbCapture
How to use SmartExtract
Troubleshooting
EDD
EDM
PIA
Implement PIA with SmartExtract
Information
With R14, there are two options for the PIA solution.
You can either use the DbCapture OCR system, in a virtually identical way to Release 13.3, which makes for a smooth upgrade for existing users, or you can use the new SmartExtract system.
SmartExtract is recommended for new users. It makes use of Artificial Intelligence (AI) and Machine Learning (ML) technologies rather than user-created templates.
This can offer improved automation for users who have struggled with templates in DbCapture, but will require staff to be retrained.
Please ensure you have licences for the correct version before starting the installation. If in doubt which to use, please discuss with your account manager.
NOTE: Currently SmartExtract currently only supports invoices and credit notes. If your PIA implementation has been customised to handle other documents, such as supplier statements or customer remittances, you will need to stick with DbCapture.
Assumptions
For the purposes of this document, the following assumptions are made, change as appropriate to your installation:
• The setup program has been run to completion
• The V1 directory where the setup program has installed the server components is C:\V1 (if not installed here, change to reflect the path you have installed to)
• The Sage Endpoint you’re using is SEED
• You have access to the SQL Management Console / instance to which the setup program installed the Baseline installation
EDM for Sage X3 R14 has been fully installed and those Sage Endpoints that wish to use PIA with SmartExtract are patched for R14.
At the minimum, you must be licensed for the following:
• EDM
• SmartConnect
• PIA
• SmartExtract
• SmartMail (Including SmartMailSend (SMTP)
• DbLogin Admin Console
If any of the above assumptions cannot be met, STOP.
You will cause delays to the project if you skip / bypass any steps.
Assuming everything is in place, continue to the next chapter.
Configure NIS to connect to SmartExtract
Now the new V1Documents database has been created, you can configure NIS to connect to it allowing you to then complete the remainder of the installation.To streamline the number of databases used by EDM for Sage X3 R14, this single database will house all the SmartExtract data as well as the new methodology for user management.
Future releases will extend on this also housing the DbArchive data, but for R14, this remains in its own database as initialized by the setup program.
1. Using your web-browser of choice, navigate to http://127.0.0.1:5002
2. Log in as administrator / administrator
3. Change the URL from http://127.0.0.1:5002/portal to http://127.0.0.1:5002/config and press enter
4. Scroll down to the SmartExtract section, select a purge frequency for exported documents
5. Click OK
6. Log out and close your browser
Import the SmartExtract DbArchive Table Structure
A tables.xml (containing all the tables and fields needed) has been provided to facilitate day to day processing of documents using SmartExtract where such images are archived.1. Open the DbLogin Admin Console
2. Click on the DbArchive Table Editor
3. Click on Import From XML
4. Browse to C:\EDMR14\DbArchive\Server\SE_PIA_tables.xml, click Open
5. Wait a few seconds and you should see the tables appear
6. Using the button, re-order them so they are in alphabetical order
7. Click save
8. Close the DbLogin Admin Console
Copy the def files
4 def files have been provided to allow the validation, deletion, putting a document on hold and the export of documents from SmartExtract to DbArchive and export to Sage X3.1. Browse to C:\EDMR14\SmartConnect\SmartConnectAPI\defs and copy the def files to your clipboard
2. Open File Explorer
3. Browse to C:\V1\SmartConnect\SmartConnectAPI\
4. Create a directory called defs
5. Copy the defs in your clipboard into the C:\V1\SmartConnect\SmartConnectAPI\defs directory
Create the Category
A Category in SmartExtract is the top level area to hold the queue(s) of documents under which they relate.1. Login into the SmartSuite as administrator / administrator
2. Click on SmartExtract
3. Click on Manage Categories
4. Click on Add category
5. Give it a name of SageX3 and click Save
Import the Queue(s)
Now the Category has been created, you can import a sample queue.Each queue reflects the same name as the Sage X3 Endpoint you wish to use it against and that is patched for use with R14.
In our example, we will use SEED, name yours to match the Sage X3 Endpoint you wish to use:
1. Click on Manage queue
2. Click on Add queue
3. Give it a name of SEED
4. Assign the Category SageX3
5. Give it an Email address (one configured in SmartMail and available using your mail-server of choice discussed later on this page)
6. Ensure to move the slide bar turning Line item extraction to the on position. (Line Level OCR is not a part of the integration, but is required as a licensed component for the grid.)
7. Click Save
8. Click the Import button
9. Browse to the \EDMR14\SmartSuite directory and select the SE_QUEUE_SAMPLE.json
10. Click Import Data
Now the Category has been created and the Queue imported, you are advised to familiarise yourself with it's configuration / make any changes to align with the customer requirements.
Configure the Queue(s)
For each queue you have now created:• Click the pencil icon next to it to see it's configuration options
The following is a high level summary of your options:
Queue
This is the top level configuration you set when creating it.
Sub queue
A Sub queue inherits the settings from the top level queue and these can be used to further segregate documents.
NOTE: The standard solution does not utilise sub queues 'out the box'.
Fields to extract
As it's name suggests, these are field definitions that a user will see when they process a document.
Below is a summary of the options each field has and what they mean. The subsequent chapters expand on those areas that need specific configuration:
| Definition | Role |
| Type | The type of field, whether one built in to SmartExtract, or Custom, one you want to create yourself |
| Name | The internal field name, this is what is used in conjunction with a def files for instance |
| Display Name | How the field name is displayed to the end user |
| Mandatory | Select this to mean it must have a value |
| Read Only | Select this to mean no user interaction with the value in it is permitted |
| View in Doc List | This field visible in the document summary screen |
| External | Selecting this means the value is obtained exclusively from a lookup, not selected means it’s exclusively obtained from OCRing the value from the document. You cannot have a hybrid of both. |
Countries
SmartExtract is optimised to work with many European countries, if you have a requirement to recognise more / other countries, tick the box next to it and click Apply.
Languages
SmartExtract is optimised to work with many European languages, clicking the pencil next to each allows granular configuration of settings to further enhance recognition.
Trained documents
When a document is 'trained' it means it has been fully processed by the system and when the same document is seen again, it will be recognised more accurately than one that has not yet been trained.
Import Vendors
The SmartExtractVendorImport add-on will automatically import Supplier details from Sage X3 periodically, but if you have not installed it / have a requirement to import them, you can use this facility to import them manually. Download the sample file to see the format required (in CSV format).
Manage Vendors
This lists Vendors that have been added to the system, either automatically by by the SmartExtractVendorImport add-on, manually via the Import Vendors manual import. Vendors can be added manually by clicking the Add Vendor button and filling on the required information.
Manage business unit
The SmartExtractVendorImport add-on will automatically import Business Unit details from Sage X3 periodically as part of the Vendor Import process, but if you have not installed it / have a requirement to add them, you can use this facility to add them manually.
OnHold reasons
Further explanation of these is in the following chapters.
Extract Events
Further explanation of these is in the following chapters.
Import Configuration
At a high level, the ability to import a DbCapture profile and use it to build a SmartExtract queue.
This is activity will form part of an upgrade and is a Professional Services engagement.
Field Summary
Most fields in a SmartExtract Queue are self explanitory, below summarises the fields present in the Queue, their role and how they're used.More details on specific usage can be found in the How to Use SmartExtract chapter.
- Supplier Fields
- The Supplier fields are the most important, all lookups and validation hang off them so you are advised to identify them first, before validating any others.
- BU Fields
- The Business Unit fields are also very important, some lookups and validation hang off them so you are advised to identify them after the Supplier, before validating any others.
- Upload Type
- New for R14, this allows flexibility on how the document is exported based on any duplicates that have been found.
Create in Sage X3 and Archive to EDM, just Create in Sage X3, or just Archive the document against an existing transaction in Sage X3 if already present.
- Order / Receipt Matching
- Fields for extracting Order Numbers, drop downs for outstanding orders / receipts and extracting Packing Slip Numbers to then get the corresponding Receipt number, all contribute to matching the Invoice with it's associated Order / Receipt where applicable.
- Process Type
- Representing the 3 letter Sage X3 object, if an Account Structure is found and no order / receipt lines present, this will be set to BIS. If no account structure is found and / or order / receipt lines are present, it will be set to PIH.
- Document Type
- SmartExtract is attuned to automatically recognise whether a document is an Invoice or Credit note. 2 drop downs confirm this detection Yes / No.
- Document Currency
- A document currency can either be extracted from the document, or selected from a drop from those available in Sage X3.
- Site Code and Invoice Type
- The Site Code and Invoice Type are crucial fields needed for the upload into Sage. The Site Code has flexibility on how it can be identified covered in detail in the How to Use SmartExtract chapter.
- Dates
- The Accounting date defaults to the day the document was first imported and is validated against the open fiscal period, the Invoice Date is extracted from the document.
- Monetary Values
- Net, Vat, Gross plus Shipping and Discount values are all validated and where lines are present, compared.
NONPOP vs POP
A NONPOP Invoice is one where no Purchase Order / Receipt matching is required (this includes the PIH and BIS Sage X3 objects).A POP Invoice is one where Purchase Order / Receipt matching is required (a POP Invoice only creates documents against the PIH Sage X3 object).
The out the box solution assumes POP processing, so contains all the fields required. However, to preserve screen real estate / if the customer only has a requirement for NONPOP processing, these fields can be removed. No code changes are required.
If you ONLY wish to process NONPOP / BIS Invoices, click the dustbin icon and remove the following fields:
Header
OrderNumber
SUPPLIER_PURCHASE_ORDERS
SUPPLIER_PURCHASE_RECEIPTS
PACKING_SLIP_NUMBER
Lines
All the LineItems fields.
Re-Order Fields
Now your queue has been imported, the fields can be re-ordered so they appear in a more desirable position to fit the requirements of users.NOTE: The standard field ordering is in the correct order expected by the scripting files validating their content, so re-order with caution.
From the Fields to extract menu, click on Reorder fields, select the Header tags. By dragging each field up / down, you can change the order their displayed.
Where POP processing (which has a grid), again click on Reorder fields, but this time select Line headers.
Ordering top to bottom corresponds to left to right in terms of display.
Below is an example with some sample values to give context:

When all fields have been re-ordered, click Save.
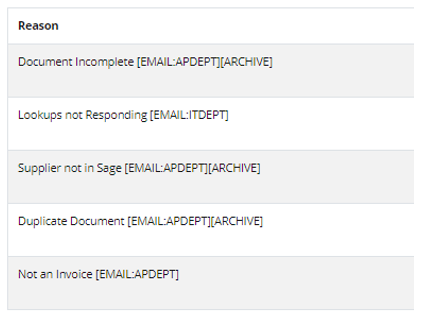
Add On hold reasons
Q:What is an On Hold Reason?A: An On Hold reason is a basic form of workflow to allow a document to be put ‘on hold’ where it may require further action before it can be exported into EDM and Sage X3.
OnHold Code
Q:What is an On Hold Code?
A: An On Hold code is a choice of activity performed when a document is put on hold.
It can be emailed either directly to an email address, or the email address found for the DbLogin user specified and/or archived to a dedicated EDM table called SmartExtract OnHold Documents.
[EMAIL:fred@mycompany.com]
Will email fred@mycompany.com informing them the document has been put on hold.
Or
[EMAIL:APDEPT]
Will email it to the email address found for the DbLogin user APDEPT informing them the document has been put on hold.
[ARCHIVE]
Will archive the document when put on hold to the SmartExtract OnHold Documents EDM table. Where emailed as well, a link will be provided to the image in the email.
The advantage of this is, none SmartExtract and/or external SmartRetrieve users can see a real-time snapshot of documents on hold in SmartExtract.
If no OnHold Code is added, no activity is triggered beyond the document being moved from To be Checked to the OnHold state and the reason given.
Click on On hold reasons
Click on Add reason and reflect the below as some common scenarios, as many / few can be added to meet the customer requirements with no further code changes.
Add Extract Events
Q:What is an Extract Event?A: An Extract Event links SmartConnect to SmartExtract allowing the lookups and exports into Sage X3.
SmartConnect is installed locally to SmartExtract, so can be configured as below:
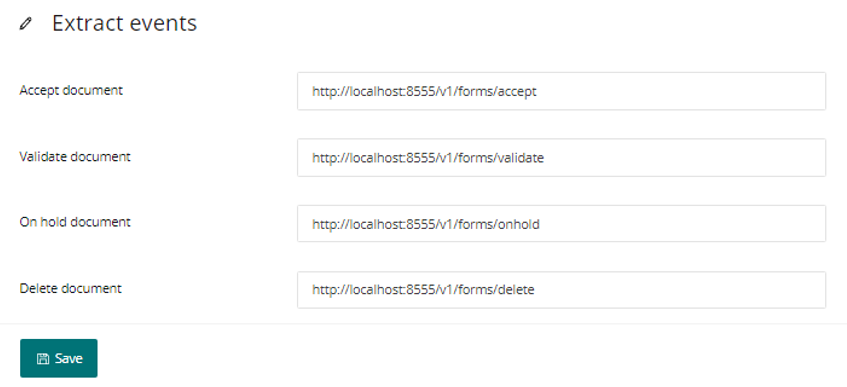
When the values are set, click Save.
Vault Settings
This is a very important chapter, please read carefully.To enhance the security of the solution, all settings / username / passwords involved in communicating with Sage X3 and V1 using SmartExtract have been moved to a secrets engine called Vault, by HashiCorp.
In previous versions, these settings were stored on disk in files (such as V1_SETTINGS.def) the use of this file and any others performing similar roles have been deprecated in favor of Vault.
NOTE: EDM and PIA using DbCapture still use a V1_SETTINGS.def file.
SmartConnect is used to securely interrogate Vault for its values as an when they are needed when using the solution day to day.
Vault has already been installed by the setup program; you can now import and set the secrets area to store the settings for SmartExtract.
A json file has been provided for you to import sample values into Vault:
• Navigate to http://127.0.0.1:8200
• Where prompted, enter the Route Token ID
• To find this, using File Explorer, navigate to C:\V1\SmartConnect.
• Open the appsettings.json and copy the RTID value. This is the Route Token ID to login in to Vault as installed by the setup program.
• Click on Create secret, give it a name of X3
• Toggle the JSON button at the top of the screen
• Using File Explorer, navigate to C:\EDMR14\Vault
• Open the vault_sample_R14.json file and copy the contents to your clipboard
• Paste the contents into the Secret data window and click Save
• Un-toggle the JSON button
• You should now see all the required settings, the values for which are defined as follows, set them as appropriate to your requirements / environment:
| Key | Value Options | Definition |
| ARCHIVE_DELETED_DOCS | 1 0 |
When a document is deleted, 1 = Archive it, 0 = Don’t |
| BASE64AUTH | QURNSU46YWRtaW4= | The Syracuse username and password in Base64 separated by a colon, i.e. admin:admin |
| CHECK_DBA_DUPLICATE | 0 1 2 |
0 means de-activate checking DbArchive for a duplicate Supplier Invoice Number 1 means turn it on and return a warning if found 2 means turn it on and return an error if found |
| CHECK_ERP_DUPLICATE | 0 1 2 |
0 means de-activate checking Sage X3 for a duplicate Supplier Invoice Number 1 means turn it on and return a warning if found 2 means turn it on and return an error if found |
| CHECK_OHQ_DUPLICATE | 0 1 2 |
0 means de-activate checking the SmartExtract Queue a duplicate Supplier Invoice Number 1 means turn it on and return a warning if found 2 means turn it on and return an error if found |
| DEBUGMODE | 0 1 |
0 means leave debugging of lookup timings off 1 means turn them on. NOTE: Turning them on will adversely affect validation performance, so it is not advised to leave this on, unless debugging |
| DEFAULTENDPOINT | SEED | Where a Sage Endpoint cannot be identified (for example during an ambiguous import) set the value |
| EMAIL_ACCEPTED_DOCS | 1 0 |
1 means send an email to the user who accepted it with confirmation, log attached, a link to both the image and Invoice in Sage X3 0 means don’t send an email |
| EMAIL_DELETED_DOCS | 1 0 |
1 means send an email to the user who deleted the document with a link to the document in SmartRetrieve, 0 means don't send an email. |
| EMAIL_FAILED_DOCS | 1 0 |
1 means send an email to the user who attempted an export which failed, zipped up copy of the document dir attached, SmartConnect.log for that day and a link to the V1 Support site. |
| INUSEDBAPASSWORD | mypassword123 | Enter the password of the DbLogin user licensed for DbArchive you are using for communicating with DbArchive. This is typically administrator. |
| INUSEDBAQUERYPORT | 31418 | Enter the query port used by DbArchive, this is typically 31418. |
| INUSEDBASERVER | 127.0.0.1 | The local IP address of the server you're on / where DbArchive is installed. |
| INUSEDBAUSER | myuser123 | Enter the username of the DbLogin user licensed for DbArchive you are using for communicating with DbArchive. This is typically administrator. |
| INUSEDBAWRITEPORT | 31417 | Enter the write port used by DbArchive, this is typically 31417. |
| NISURL | http://localhost:5002/api | The base URL of the V1NodeIntegration server. Browsing to this should display a list of API’s. |
| OCRSITEIDENT | 1 0 |
0 Use a combination of the extracted / imported BU Street | BU Name | Supplier Code as the Site Code Identifier 1 means use any value extracted from the document (akin to R13 Patch 3) |
| PASSTAXWITHINVOICE | 1 0 |
0 means do not send the tax with the payload 1 means send the tax with the payload |
| PROCESSORDERS | 1 0 |
See below for an explanation of this setting. |
| PROCESSORDERSGRIDTOTALCHECK | 0 1 2 |
0 Means do not validate the sum of lines against the header totals 1 Means check them and if they’re wrong, display a warning 2 Means check them and if they’re wrong, display an error |
| PROCESSORDERSPATTERNSEQUENCE | See below for an explanation of this setting. | |
| PROCESSORDERSRECEIPTED | 0 1 |
0 means where an Order has been identified, return the lines 1 means where an Order has been identified, return the receipt lines for that order |
| SITECODEDROPDOWN | 1 2 |
1 Means when processing a NONPOP Invoice, return Purchasing sites to the Site Code drop down 2 Means when processing a NONPOP Invoice, return Invoicing sites to the Site Code drop down |
| SOAPLANG | ENG | Enter the 3 letter language code of the Sage X3 pool alias created in conjunction with the setup |
| SYRA_PASS | Mypassword123 | The password of the Syracuse user nominated for V1 lookups |
| SYRA_USER | Myuser123 | The username of the Syracuse user nominated for V1 lookups |
| V1_DIR | C:\\V1 | Enter the root directory of the installation NOTE: The double backslashes is deliberate |
| WEBADD | http://172.26.49.222:8124/ | The root url of Syracuse including any port and a trailing slash on the end. |
| WEBPORTALURL | http://localhost:5002/ | The base url of the V1 WebPortal. Browsing to this should give you a login page.. |
PROCESSORDERS Setting
This setting dictates the behavior of order matching in the queue giving flexibility as to how orders are processed and Invoiced in Sage X3.
You have the following options:
PROCESSORDERS = 0
This means no attempt will be made to process any orders found on a document. (Set this to 0 if you've removed the POP related fields as in the previous chapter).
This is best suited to customers who have no requirement for POP processing and just want to create NONPOP PIH or BIS Invoices with no lines.
If lines are required, they must be manually added from the left list in Sage X3 when the Invoice has been created prior to being posted.
PROCESSORDERS = 1
This aligns with a typical DbCapture solution and closely mirrors the functionality of R13.3, namely, where an Order number is extracted from the Invoice, its lines are obtained from a lookup in Sage X3 and validated against the total on the Invoice.
If there’s any discrepancy, the user is directed via status messages to correct the values based on the severity of the PROCESSORDERSGRIDTOTALCHECK value.
This is best suited to customers who rely heavily on POP processing and gives the requirement to allow amending the values in the grid prior to it being processed.
PROCESSORDERSPATTERNSEQUENCE Setting
NOTE: Only activated If PROCESSORDERS = 1
Introduced in R13.3 and continuing support in R14, this allows for Pattern Matching of Purchase Order numbers found on a document. This pattern is in part dictated here:
[ ]*[A-Z][ ]*[A-Z][ ]*[0-9][ ]*[0-9][ ]*[0-9][ ]*[0-9][ ]*[0-9][ ]*[0-9][ ]*[0-9]
In this example, 2 letters followed by 7 numbers, and in part by the XV1ANMLU webservice which returns the sequence and length of an Order from X3.
The combination of these actions means, where a candidate string is found on an Invoice (for example POGB0110042), a lookup is performed. Where lines are found for that candidate value, they are returned to the grid automatically.
This means without any manual intervention; all suitable candidate values are added to the grid.
Configure V1SmartMail for receiving emails
NOTE: Using V1SmartMail to import images into PIA with SmartExtract, there is a dependency on the SmartExtractPickup addon.
V1SmartMail allows an unlimited number of mailboxes to be polled for attachments and where found, extract them.
Now installed, it must be configured.
The following steps walk you through exactly what configuration is needed.
Assumptions:
• You must be logged on to the V1 Server where the Server installation has been performed
• The PIA installation is under C:\V1
• You have access to the mail server you intend to use and the capability to create / administrate mailboxes. Have the credentials to hand.
• As an example, your domain is mycompany.com. Change as appropriate.
Pre-Requisites
• invoices@mycompany.com
This is an external mailbox.
If your suppliers wish to send you PDF Invoices electronically, supply them with this email address.
Procedure
1. Using File Explorer, navigate to C:\V1\Utils
2. Right click and run as administrator the start_services_debug_smartmail.bat (this starts the V1 Smart Mail service in debug mode.
NOTE: V1 Smart Mail can only be configured in debug mode to prevent erroneous usage
3. Open your Web Browser of choice and navigate to http://localhost:8444, this is the configuration screen
General Configuration
4. Set log mode to console and file
5. Set Log Level to log errors only
6. Set Store log file Audit to yes
7. Set Purge log files older the # days to 30
8. Using File Explorer, ensure the path to cscript.exe is correct
9. Set cycle mailBoxes to run continuously
10. Set poll time in seconds to be no lower than 30, 60 seconds or higher is advised
11. Click the dustbin icon to remove any sample Mail Servers
Add your mail server
12. Click the Add new Server icon to add a new server. Enter your intended mail server configuration, give it a meaningful name as it will be used to identify it.
13. Click the Add new Mailbox icon to a new mail box
14. Add an identifier of PIA
15. Ensure the Server ID is the same as the one configured
16. Enter an email address of invoices@mycompany.com
17. Enter the password to access this mailbox
18. Click the box Enabled
19. In the first dropdown, select EXTRACT as the action
20. Where prompted for File extensions, enter PDF
21. Supply an Attachment path of C:\V1\SmartExtractPickup\IMAGES
22. In the dropdown below, select SAVEMSG
23. Supply a Save Message path of C:\V1\SmartExtractPickup\EMAILS
24. Tick the middle two options, leave the first and last un-ticked
25. In the dropdown below, select DELMSG
26. Click OK
27. Click Save configuration at the bottom of the screen.
28. Close your browser
29. Go back to the CMD window you launched to start V1 SmartMail in debug mode, close the window
30. Open services.msc and start V1 SmartMail service.
This completes the baseline implementation of PIA with SmartExtract, you should now have a functional system.