Downloads
Server Components
Client Components
Add-on Components
Server Installation
Pre-requisites
Install the Server Components
Server Licensing
How to Apply Licenses
Client Installation
Install the Client Components
Server Implementation
Step 1 - DbLogin
Step 2 - DbArchive
Step 3 - SmartPortal
Step 4 - SmartMail
Add-On Installation
Install Add-On Components
Server Administration
Logs
Multi-Instance Management
Un-Install
Integrations
What can I integrate with?
Troubleshooting
Solve a Problem
Support
Contact Support
Install the Server Components
This page is split in to three sections.
The first section Pre-Deployment Tasks covers the steps required before starting either automatic or manual installation.
The second Section Automatic Deployment covers the steps required when using the SmartDeployServer binary.
The third section Manual Deployment covers the steps required if you have wish to install a component manually.
You are strongly advised wherever possible to use the Automatic Deployment option, however in some isolated cases, manual is more suitable.
NOTE: Before installing any server components (whether using SmartDeployServer or manually) ensure to not have open the services.msc window or RegEdit.
NOTE: These instructions are at quite a high level assuming good knowledge of Windows / basic database administration.
Pre-Deployment Tasks
Before you start, whether installing Automatically using SmartDeployServer (recommended) or Manually, it is critically important the following are adhered too. Ignoring / skipping them will lead to problems down the line. Tick them off one by one.
Where installing:
- DbLogin
- Ensure port 32000 is open on the firewall
- DbArchive
- Ensure ports 31417 and 31418 are open on the firewall
- You know which database backend you want to use, you can use PostGRE, MS SQL or Oracle, they are installed and you have full access to them.
- Where PostGRE
Create a database called DbArchive using pgAdmin and know the credentials to access it.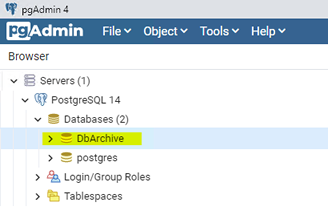
- Where MS SQL
Using the SQL Server Configuration Manager, make sure TCP/IP and Named Pipes are enabled for the instance you are using.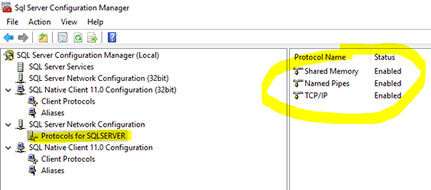
Create a database called DbArchive using SQL Management Studio and know the credentials to access it, ensuring the collation is set to Latin1_General_CI_AS.
Create a 32-Bit System DSN ODBC (selecting the SQL Server Native Client 11.0 driver) connecting it to your database called DbArchive.
Click here for a 1 minute video on how to do this.
- Where Oracle
Create a database called DbArchive and know the credentials to access it
- DbCapture
- Ensure ports 31450, 31451 and 31452 are open on the firewall
- DbCapture only support a MSSQL Database.
- Create a database called DbCapture using SQL Management Studio and know the credentials to access it, ensuring the collation is set to Latin1_General_CI_AS.
- DbAuthorise
- Ensure ports 31420 and 31421 are open on the firewall
- DbAuthorise only support a MSSQL Database.
- Create a database called DbAuthorise using SQL Management Studio and know the credentials to access it, ensuring the collation is set to Latin1_General_CI_AS.
- Now created, following the DbArchive guidance above, Create a create a 32-Bit System DSN ODBC (selecting the SQL Server Native Client 11.0 driver) connecting it to your database called DbAuthorise.
- SmartSuite
- Ensure ports 5002, 32010 and 3001 are open on the firewall
- You know which database backend you want to use, you can use PostGRE or MS SQL, they are installed and you have full access to them.
- Where PostGRE
Create a database V1Documents using pgAdmin and know the credentials to access it (as per the above screen shot) - Where MS SQL
Using the SQL Server Configuration Manager, make sure TCP/IP and Named Pipes are enabled for the instance you are using. (as per the above screenshot).
Create a database V1Documents using the SQL Management Studio and know the credentials to access it, ensuring the collation is set to Latin1_General_CI_AS.
NOTE: Unlike DbArchive, no DSN is required for the SmartSuite.
Using Task Manager > Details, check that msiexec.exe is not running / present as this can prevent the MSi's in SmartDeployServer from firing.
Automatic Deployment
The SmartDeployServer binary is based on PowerShell, it asks relevant questions about your environment before allowing you to choose which components to download and install.
NOTE: Larger downloads (such as the Integration Server and ABBYY) are 'chunked', giving an update of progress every 10 seconds as a percentage until completed.
SmartDeployServer
Now the Pre-Deployment Tasks have been satisifed, you can run SmartDeployServer.
- Download SmartDeployServer from the Server Components page.
- Un-compress to a temporary location on disk (NOTE: Do not run from within the zip file, it must be un-compressed first)
- Right click and RUN AS ADMINISTATOR (this is very important)
- A check is done on execution policy rights, if asked, press Y, then enter (to indicate you are happy to execute the binary)
- A check is done on the version of Powershell found
- A check is done on the version of .NET found
- A check is done on a decent internet connection
- You are asked to confirm you have read and understood the pre-requisites
- You are asked to confirm the location you'd like to install the software (copy / paste this from File Explorer)
- We then get into the physical act of installing each component in the following order as a Y/N
- DbLogin
- Installs the DbLogin service on port 32000 silently
- DbArchive
- You are asked which back end you wish to use, PostGRE (the default), MS SQL or Oracle. Based on your selection, the relevant binary is downloaded and applied.
- Based on your selection, you are asked for the relevant authentication credentials
- Installs 2 DbArchive services on ports 31417 and 31418 silently
- DbForm
- Installs DbForm silently
- ArchJSON
- Installs ArchJSON silently
- HTTPServer
- Installs HTTPServer silently
- Integration Server
- Installs Node Integration Server interactively (on screen instructions provided)
- ABBYY11
- Installs ABBYY11 silently
- DbCapture
- You are asked for the relevant SQL authentication credentials
- Installs all services and applies all registry entries required to fully install the DbCapture server components.
- DbAuthorise
- You are asked for the relevant SQL authentication credentials
- Installs all services and applies all registry entries required to fully install DbAuthorise.
- SmartMail
- Installs SmartMail silently
For each download, after the installation of that component has completed, you are asked if you want to purge the zip file to preserve disk space (Y / N).
Manual Deployment
You are strongly advised to always use Automatic Deployment via the SmartDeployServer binary, if this has not been possible, the following details how to install each component manually.
Be advised, you will not be able to use either SmartDeployClient or SmartDeployAddon if you chose to do it manually.
DbLogin
NOTE: DbLogin must be installed first as all other components route through it.
Install the DbLogin Service
1. Download DbLogin.zip and uncompress the directory beneath the root of the top level dir, i.e. C:\V1Home, so you end up with C:\V1Home\Dblogin
2. Open a CMD prompt as administrator, CD to C:\V1Home\DbLogin and enter the following command:
DbLoginServer.exe -name "V1DbLoginServer" -install "V1DbLoginServer-32000" 32000@any C:\V1Home\DbLogin
3. Press Enter
DbArchive
Download DbArchive.zip and uncompress the directory beneath the root of the top level dir, i.e. C:\V1Home, so you end up with C:\V1Home\DbArchive
Where the Database is PostGRE
Download the DbArchive for PostGRE executable and uncompress in to C:\V1Home\DbArchive directory
Configure DbArchive.ini
1. Using a suitable text editor (such as Notepad++) open file explorer and edit the C:\V1Home\DbArchive\dbarchive.ini
2. Set the Paths to align with your actual environment
3. Set the DbLoginServerName=VALUE to be the server name you’re on (or 127.0.0.1 / localhost)
4. Edit the string pgconnectionstr="hostaddr=$ dbname=DbArchive user=% password=@"
Where $ is the servername
Where % is the postgres user who created the database
Where @ is the password to for this user
5. Save the file
Where the Database is SQL Server
Using the SQL Server Configuration Manager, make sure TCP/IP and Named Pipes are enabled for the instance you are using.
Download the DbArchive for MS SQL executable and uncompress in to C:\V1Home\DbArchive directory
Create DSN
DbArchive uses ODBC to make its connection to the SQL database, so a DSN must be created.
Make sure to have the SQL user credentials to hand.
1. Go to Start > Administrative Tools > ODBC Data Sources (32-bit)
2. Click the System DSN tab
3. Click Add..
4. Select SQL Server as the Data Source, click Finish
5. Give it a name of DbArchive, a description and select the SQL Server from the dropdown, click Next
6. Select With SQL Server authentication
7. Tick the box to connect to SQL Server to obtain default settings
8. Enter the Login ID and password, click Next
9. Tick the box to change the default database and from the dropdown select DbArchive, click Next
10. Click Finish
11. Click Test Data Source … and make sure it connects OK
Configure DbArchive.ini
DbArchive.ini holds the connection information for the service installed in the next chapter to the database, DbLogin and the SmartSuite. Replace the text in red with the values required:
1. Using a suitable text editor (such as Notepad++) open file explorer and edit the C:\V1Home\DbArchive\dbarchive.ini
2. Set the DbLoginServerName=VALUE to be the server name you’re on (or 127.0.0.1 / localhost)
3. Set the odbcconnectionname=VALUE to be V1DM
4. Set the odbcusername="VALUE" to be V1USER
5. Set the odbcpassword="VALUE" to be the SQL password you set for V1USER
6. Set the NIS=http://VALUE:6181 to be the server name you’re on (or 127.0.0.1 / localhost)
7. Save the file
Where the Database is Oracle
Download the DbArchive for Oracle executable and uncompress in to C:\V1Home\DbArchive directory
Configure DbArchive.ini
DbArchive.ini holds the connection information for the service installed in the next chapter to the database, DbLogin and the SmartSuite. Replace the text in red with the values required:
1. Using a suitable text editor (such as Notepad++) open file explorer and edit the C:\V1Home\DbArchive\dbarchive.ini
2. Set the DbLoginServerName=VALUE to be the server name you’re on (or 127.0.0.1 / localhost)
3. Set the odbcconnectionname=VALUE to be V1DM
4. Set the odbcusername="VALUE" to be V1USER
5. Set the odbcpassword="VALUE" to be the SQL password you set for V1USER
6. Set the NIS=http://VALUE:5002 to be the server name you’re on (or 127.0.0.1 / localhost)
7. Save the file
Install the DbArchive Services
Now DbArchive.ini has been configured, the services can be installed.
1. Open a CMD prompt as administrator, CD to C:\V1Home\DbArchive and enter the following command:
DbCSArchiveServer.exe -name V1DbArchiveServer-31417 -install "V1DbArchiveServer-31417" 31417@any C:\V1Home\DbArchive\DbArchive.ini
3. Press Enter
DbCSArchiveServer.exe -name V1DbArchiveServer-31418 -install "V1DbArchiveServer-31418" 31418@any C:\V1Home\DbArchive\DbArchive.ini
3. Press Enter
Install the SmartSuite
For each of the following, download the associated MSi, un-compress to a temporary location.
1. Run the ArchJsonSetup.Msi, agree to the defaults ensuring the installation dir is C:\V1Home\SmartSuite\ArchJson
2. Run the HTTPServerInstaller.Msi, agree to the defaults ensuring the installation dir is C:\V1Home\SmartSuite\HTTPServer
3. Run the NISSetup.Msi, when asked to give it a name (leave that blank, just click Next) set the port to 5002. Ensure the installation dir is C:\V1Home\SmartSuite\IntegrationServer
Install ABBYY11, DbCapture and/or DbAuthorise
The installation of ABBYY11, DbCapture and/or DbAuthorise typically require a Professional Services engagement, so no instructions can be provided to install them manually.
To request information, contact the support team.
Install SmartMail
Download the SmartMailInstaller.MSi, un-compress to a temporary location.
1. Run the MSi, agreeing to the defaults, ensuring the installation dir is C:\V1Home\SmartSuite\SmartMail
Firewall
The following binaries must be added to a whitelist / Firewall exceptions / Windows smart screen:
Document Delivery
DbForm.exe
DbLoginServer.exe
Document Archiving (those in Document Delivery, in addition)
httpPost.exe
DbCSArchiveServer.exe
DbLUQuery.exe
DbCSQuery.exe
DbCSBLOB.exe
DbRemoteBlob.exe
Add-on Components (those in Document Delivery and Document Archiving, in addition)
V1SmartConnect.exe
vault.exe
Anti-Virus / Malware
Given the number of files generated as part image processing, you are advised to add the \V1Home directory to a whitelist / exclusion area to prevent possible performance issues with real-time scanning can cause performance issues.
Services
Although not mandatory, you are advised to review the services (open using services.msc) to ensure ArchJson and all V1* services are set to Automatic (delayed start)