Information
What is SmartConnect?
Compatibility
Downloads
SmartConnect
SmartApprove
V1FilterMapMaintenance
V1HouseKeepingManagement
V1Logs2Email
V1UpdateService
Documentation
SmartConnect
SmartApprove
V1FilterMapMaintenance
V1HouseKeepingManagement
V1Logs2Email
V1UpdateService
Administration
Logs
Postman Collections
Tweaks
Enhancement
Request an Enhancement
Support
Contact Support
SmartApprove
Pre-Requisites
The following core software must be installed / licensed for before applying SmartApprove:
Mandatory:
• SmartConnect
• Vault
• The V1 SmartSuite
• SmartMail (including SmartMailSend)
• DbQDes
Assumptions
For the purposes of this document, the following assumptions are made, change as appropriate to your installation:
• The V1 Server components have been fully installed / implemented
• The Server Installation is applied to C:\V1Home
• The V1 server is named V1SERVER
NOTE: What you are about to implement is a sample using typical values and whilst functional, will require some bespoke change based on the actual requirements of the customer.
Copy File
This sample approve.def provided will deal with all activity for accepting, rejecting and querying a document (based on the TRANSFORM respectively).
Being a def file it is obviously extremely flexible, the sample gives you everything you need to get a system up and running.
1. On the V1SERVER, download approve.zip
2. Un-Compress it to a temporary location
3. Copy the def file in to C:\V1Home\SmartConnect\SmartConnectAPI\defs
Configure Vault
Using your browser of choice, connect to the V1 Server and navigate to http://localhost:8200
Where promoted, enter the Token
1. Click Sign In
2. Click kv
3. Click Create secret
4. Enter the Path for this secret to be SMARTAPPROVE (NOTE: This MUST be in UPPERCASE)
5. Toggle the JSON button so you see a black Secret data screen with blank values
6. Navigate to where approve.zip was un-compressed
7. Open the approve_vaultsettings.json file in your text editor of choice and copy the contents to your clipboard
8. Paste it into the Secret data screen
9. Click Save
10. Un-toggle the JSON button
You have now imported all the settings required and they contain sample values, the table below explains what each of them represent.
Click Edit secret to change them and Save when satisfied they are correct.
Each are grouped together based on a prefix for that module.
| Key | Values | Explanation |
| EMAIL_ADDRESS_APPROVE | approvals@mycompany.com | A default email address approved approval emails are sent too |
| EMAIL_ADDRESS_QUERY | queries@mycompany.com | A default email query approval emails are sent too |
| EMAIL_ADDRESS_REJECT | reject@mycompany.com | A default email query approval emails are sent too |
| INUSEDBAPASSWORD | Password123 | Where DbArchive is a requirement for your approval, where to store the in use password |
| INUSEDBAQUERYPORT | 31418 | Where DbArchive is a requirement for your approval, where to store the in use query port |
| INUSEDBASERVER | V1SERVER | Where DbArchive is a requirement for your approval, where to store the in V1SERVER name / IP Address |
| INUSEDBAUSER | V1User | Where DbArchive is a requirement for your approval, where to store the in use username |
| INUSEDBAWRITEPORT | 31417 | Where DbArchive is a requirement for your approval, where to store the in use write port |
| NISURL | https://V1SERVER:5002/api | The URL of the V1NodeIntegrationServer, browsing to this should list you the API's available |
| V1_DIR | C:\\V1Home | The root directory of the V1 server components NOTE: The double backslashes is delberate and must be present |
| WEBPORTALURL | https://V1SERVER:5002 | The URL of the V1WebPortal, browsing to this should present you with a login screen |
Configure your SmartApprove Queue
Login to the V1SmartSuite as an administrative user, then complete the following steps:
1. Click on SmartApprove
2. Click on Manage queue
3. Click on Add queue
4. Where prompted:
- Give it an internal name, i.e. PURCHASEINVOICES
- Give it a display name, i.e. Purchase Invoices
- Give it an email address, i.e. purchase_invoice_approvals@mycompany.com
- Select the Field Source
- Where SmartExtract, select the queue on which it's based
- Where DbArchive, select the table on which it's based
6. Click on the pencil icon next to the queue you've just created
7. Click on Field to approve
8. Click on add field
9. Akin to SmartExtract queue management, add the fields you want to include in your queue based on the Field source you chose and tick the box whether you want to show / hide them in the document list view
10. Click Approve event
11. In all 3 boxes, copy / paste this:
http://127.0.0.1:8555/v1/forms/approve
NOTE: If you wish to use different definition files for each approval event, meaningfully name them and change the event to match without .def on the end. For this example, there is only one.
12. Click save
Your queue is now completed, for any subsequent queses, repeat the above procedure naming them accordingly.
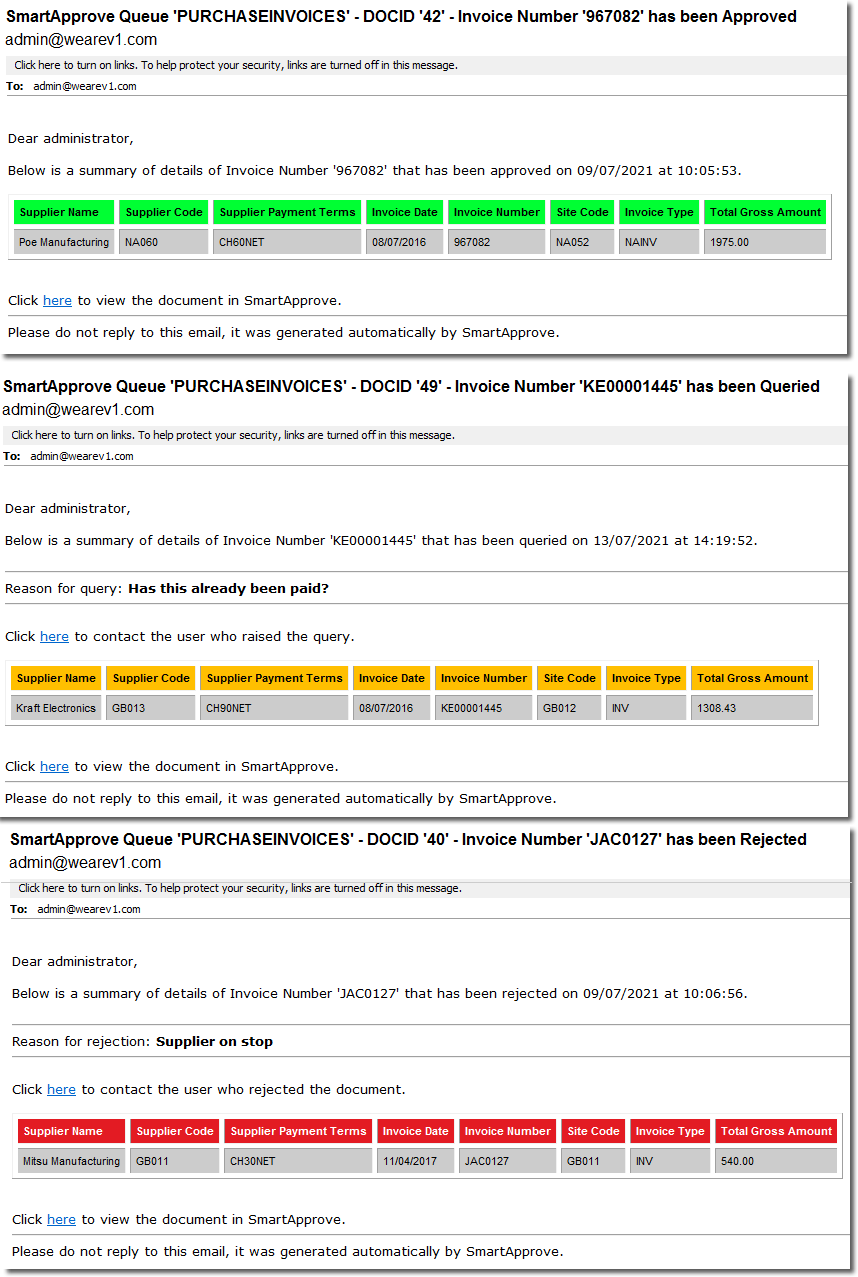
Screenshots
Sample emails are below and have a traffic light system. Green = Approved, Yellow = Queried and Red = Rejected.
Appendix
PostMan can be used to quickly test import a documents into SmartApprove.
For an integration, this activity is typically done either in a server side def file for scanning authorisation, or in a SmartExtract export definition file to pass files from SmartExtract into SmartApprove.
NOTE: Examples to do these steps* using CURL are in SmartExtractPickup and can be lifted / shifted into your definition file.
Step 1
Login to the SmartPortal*
Using either a dedicated user, or one configured to use SmartApprove, login to the application. This will return a CTID.
Step 2
Enter the application*
Often termed 'EnterApp' now you have a ctid and authenticated, you enter the application
Step 3
Call the api to import a document
POST
http://127.0.0.1:5002/api/v2/approval-queues/PURCHASEINVOICES/documents
In the Header create a key called V1-Auth-Token and give it a value of your ctid, i.e. {"ctid": "a009adf679591a2bb70d8529b87847b7"}
The body needs 3 keys, document (the image), queueName (the internal name of the queue you want to import into) and metaData (the fields you want to pass in)
Here is an example of some metaData based on the sample provided which can either be copied / pasted into PostMan for testing, or used as payload in your definition file:
{"items": [{ "name": "Supplier Name", "value": "Poe Manufacturing"},{"name": "Supplier Code", "value": "NA060"},{"name": "Supplier Payment Terms", "value": "CH60NET"},{"name": "Invoice Date", "value": "08/07/2016"},{"name": "Invoice Number", "value": "967082"},{"name": "Total Gross Amount", "value": "1975.00"},{"name": "Site Code", "value": "NA052"},{"name": "Invoice Type", "value": "NAINV"}]}
Step 4
Log off*
To ensure the user's licensed isn't locked up, Killsid to release it once your activity has been completed.
Using DbQDes:
1. Edit / add to the tag_extract matching the fields you chose to use
2. Edit the system page print_line values maching the tags you’re extracting
3. Edit the html values accordingly matching the tags you’re extracting so the table
Adding Vault entries:
1. Add to your Vault secrets the values you wish to use
2. Add the -t SECRETKEYVALUE in the [INPUT] section
3. Declare / assign the variable to the SECRETKEYVALUE read
4. Use it in the definition file as per the requirements of the customer
