Information
What is SmartConnect?
Compatibility
Downloads
SmartConnect
SmartApprove
V1FilterMapMaintenance
V1HouseKeepingManagement
V1Logs2Email
V1UpdateService
Documentation
SmartConnect
SmartApprove
V1FilterMapMaintenance
V1HouseKeepingManagement
V1Logs2Email
V1UpdateService
Administration
Logs
Postman Collections
Tweaks
Enhancement
Request an Enhancement
Support
Contact Support
SmartConnect
Pre-Requisites
This chapter is very important, do not proceed with the installation of SmartConnect until the below has been satisfied.
In conjunction with the EDM for Sage X3 setup program:
• The setup program has been run to completion.
Professional Services led installation:
The following core software must be installed by iManager before installing SmartConnect:
• DbLogin
• DbArchive
• DbForm
• The V1 SmartSuite
• V1Integration Server
• SmartMail
• Including SmartMailSend
Professional Services led installation:
During the installation of SmartConnect, you will be prompted for the NIS Client ID of the V1 server (as shown below) to authenticate SmartConnect’s API’s, please have this to hand.
Go to http://localhost:5002/config/
Click on configure integration server

Support will send you the SmartConnect*.Json file applicable to this customer. During installation, you will be promoted for this file matching the Registered client ID:

Assumptions
For the purposes of this document, the following assumptions are made, change as appropriate for your installation:
In conjunction with the EDM for Sage X3 setup program:
• The V1 directory is C:\V1
• You are logged in to the V1 Server as administrator
• Your server is connected to the internet
Professional Services led installation:
• The V1 directory is C:\V1Home
• You are logged in to the V1 Server as administrator
• You have DbForm definition files you want to use to validate, accept, put a document on hold and delete a document from SmartExtract.
• Your server is connected to the internet
Vault
Q: What is Vault?
A: Vault is an industry recognized area to store sensitive information. A requirement of SmartConnect is to use Vault to store the Client ID allowing communication between SmartExtract and SmartConnect.
In conjunction with the EDM for Sage X3 setup program:
Vault is already installed and initialized as part of the setup program so you can go to the chapter Run SmartConnect.MSi.
Professional Services led installation:
The following step by step guide walks you through installing, configuring, and committing your authentication values to the vault.
1. On the V1 Server, create a directory called C:\V1Home\V1Vault
2. Download Vault from here
3. Un-compress it and copy the vault.exe binary into the C:\V1Home\V1Vault dir
4. Download nssm from here
5. Un-compress it and copy the nssm.exe binary into the C:\V1Home\V1Vault dir
6. Download the Vault config here
7. Un-compress it and copy the config.hcl in to the C:\V1Home\V1Vault directory
You should now have 3 files in your C:\V1Home\V1Vault directory:
• config.hcl
• nssm.exe
• vault.exe
You’re ready to install it.
NOTE: If you have not chosen C:\V1Home as your default directory, edit the config.hcl file and change it to the appropriate path. Save the file. Note the forward slashes.
With Vault downloaded and the configuration file in place, install the Vault service.
8. Open a cmd prompt, cd to the C:\V1Home\V1Vault dir and enter:
nssm.exe install V1Vault C:\V1Home\V1Vault\vault.exe server -config=C:\V1Home\V1Vault\config.hcl
9. Open services and start the service
10. Open a web browser and navigate to:
http://127.0.0.1:8200/
11. Where prompted, enter a 1 for key shares
12. Where prompted, enter a 1 for key threshold
13. Click Initialize
14. Click download keys
Take note of where this has been downloaded to, you will be asked for it during the installation of SmartConnect so keep it in a safe place.
15. Click Continue to Unseal
16. Where prompted for the Master Key Portion, take the keys_base64 value from the keys file and click Unseal
17. Where prompted to sign in to the Vault, ensure the Method is Token and take the root_token value from the keys file, click Sign In
NOTE: DO NOT LOSE THESE TOKEN VALUES / KEYS FILE.
IF THE SERVER IS REBOOTED OR THE SERVICE IS RESTARTED, THEN THE VAULT MUST BE UNSEALED TO CONTINUE USAGE.
1.4 Enable the Engine
18. Scroll to the bottom and click Enable new engine
19. Where prompted, select the KV option under Generic, click Next
20. Select Method Options dropdown, set the Version to 1
This is an important selection, make sure the KV version is 1.
2 uses a different type of API request and is not supported by SmartConnect.
21. Click Enable Engine
Vault is now installed and ready to use.
Run SmartConnect.MSi
From where SmartConnect.zip has been downloaded, un-compress and run SmartConnect.MSi
• Click Next >
• Confirm the Path for installation
• You are advised to agree to the default / install it beneath the V1 root directory along with the rest of the core software
• Click Next >
NOTE: If a previous version of SmartConnect is found, you will be promoted to update it, click OK. A backup of the previous version will be found at the same level as your current installaton.
• An attempt to connect to the V1 License Server is made as soon as the UI loads
• Paste in the NIS Client ID of the your V1 Server as per the pre-requisites
• Browse to the SmartConnect Json file received as per cut of software
• Click the Register button to register the application
You will then be promoted to enter the following information:
• Host URL
• This will default to http://127.0.0.1 assuming the current machine is the server being installed on.
• For https just enter https://127.0.0.1 and so on
• The default port for SmartConnect is 8555. A check is done automatically to check its availability on the server.
• Where available a green tick is displayed
• Where not available, a red cross.
• Where a red cross, select an alternative port until a green tick is displayed
• Installation Dir
• Confirm the desired location of the installation
• You are advised to agree to the default
• DbForm Location
• Confirm the path to DbForm\bin directory containing DbForm.exe
• Def File Path
• This will default to a \defs directory beneath the SmartConnectAPI directory, you are advised to preserve this path, however it can be changed to any as required.
• Log Dir
• Confirm the path to the logs dir
• You are advised to select this within the SmartConnect directory structure; however, it can be changed to any as required.
• NIS URL
• Confirm the URL of NIS including the port and without a trailing slash
• Vault Configuration
• Vault URL
• Confirm the URL of the Vault service you installed in the previous chapter
• Browse to Vault keys file (*. json) you downloaded during its setup
• Click Install
When completed, Close
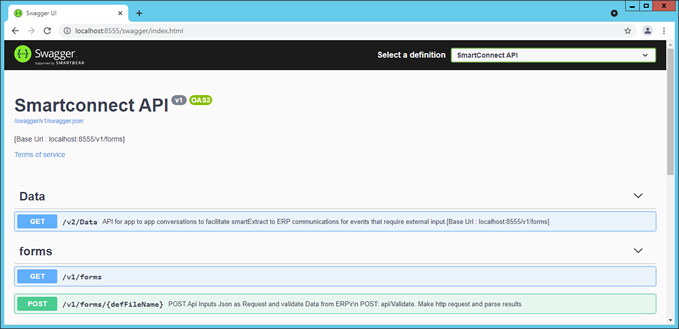
Validate SmartConnect
A new service has been created as part of the installation to serve the connection to SmartConnect’s API’s.
• Open services.msc
• Check the V1SmartConnect service is started
• Open your web-browser of choice
• Navigate to http://localhost:8555/swagger/index.html
• You should see this:
Un-Install SmartConnect
In the un-likely event you wish to un-install SmartConnect, follow this procedure:
• On the V1 Server, open Control Panel
• Right click on V1SmartConnect and click uninstall, where prompted, click Yes
Actions performed:
The V1SmartConnect Service is removed
All SmartConnect related directories are removed from the V1 Server
NOTE: Vault entries are preserved.
SmartConnectLicenseUpdate
SmartConnectLicenseUpdate is a simple UI allowing updates to licensing where they have been changed / require renewal for SmartConnect only.
• Download SmartConnectLicenseUpdate.zip and un-compress to a temporary location
• Using Windows File Explorer, copy the top level directory into the SmartConnect directory on the V1 Server (alongside the other components)
• Open SmartConnectLicenseUpdate directory, right click and 'run as administrator' SmartConnectLicenseUpdate.exe to launch it
• The default V1 License Server URL will be loaded and a check done that connectivity to it can be established
NOTE: If a different server is required, enter it and tabbing off the cell will immediately validate the connection again
• You will be prompted for the V1 Server NIS Client ID (which is the same as the Registered client ID in the NIS config), navigate to NIS config and copy this value to your clipboard
• Return to the SmartConnectLicenseUpdate UI and paste in the value
• Browse to the SmartConnect Client Registration .json file either generated yourself (where access permitted) or sent to you by the V1 Support Team
• Click the Update button
NOTE: This registers the new .json file with the License Server
• Where successful, you are prompted for the Vault URL and the Vault json file downloaded during the Vault installation
• Click the Update button and the values from the file are comitted to Vault updating the existing values to the new ones, in addition, the SmartConnect appsettings files.
This completes the procedure. SmartConnect is now ready to use with the new license details, no further action is required.
Appendix
SmartConnect Directory Structure and Files
Wherever SmartConnect is installed, it will have a directory structure as follows (created automatically when the service starts):
• Defs
• Where the DbForm definition files sit to trigger the Extract Events
• Documents
• Similar to the DbCapture\Queue directory, this houses the files for each document id, such as .spl .tag and where applicable the image.
• Logs
• All activity in SmartConnect is logged. You are advised to familiarize yourself with these. A new one is generated per day.
• SmartConnectAPI
• The executable behind the service and the config files
appsettings.json contains the paths you were asked during installation.
You can change the paths manually post installation should you need to, but it’s not recommended.
The details in appsettings.json are base64 encoded. In plain text format they would look like this:
"SmartExtractPath": {
"Path": "C:\\V1Home\\SmartConnect\\SmartConnectAPI\\Documents\\",
"DBFormPath": "C:\\V1Home\\DbForm\\bin",
"DefsPath": "C:\\V1Home\\SmartConnect\\SmartConnectAPI\\defs\\",
"LicenseAPI": "",
"hostUrl": "http://127.0.0.1:8555",
"logUrl": "C:\\V1Home\\SmartConnect\\logs"
},
VAULT": {
"UTID": "XXXXXXXXXXXXXXXXXXXXXXXXXXXXXXXXXXXXXXXXXXXXX",
"RTID": "XXXXXXXXXXXXXXXXXXXXXXXXXX",
"Protocol": "http",
"Server": "127.0.0.1",
"Port": "8200"
}
The RTID (Route Token ID) is the value you would use to manually login to Vault (by browsing to http://127.0.0.1:8200) should you wish to change any settings assuming the Vault is un-sealed.
If it is sealed, it must first be un-sealed using the UTID, then logged into using the RTID.
Vault
Wherever the V1Vault service is restarted (either manually or as a result of a reboot of the server) it is sealed and as such must be un-sealed.
SmartConnect will programmatically attempt to un-seal it, however, if the details have changed ‘behind its back’, it will need to be done manually.
1. Open a web browser and navigate to:
http://127.0.0.1:8200/
2. Where prompted for the Master Key Portion, take the UTID value from the SmartConnect appsettings.json file and click Unseal
