Information
What is SmartConnect?
Compatibility
Downloads
SmartConnect
SmartExtractPickup
SmartExtractVendorImport
SmartApprove
V1FilterMapMaintenance
V1HouseKeepingManagement
V1Logs2Email
V1UpdateService
Documentation
SmartConnect
SmartExtractPickup
SmartExtractVendorImport
SmartApprove
V1FilterMapMaintenance
V1HouseKeepingManagement
V1Logs2Email
V1UpdateService
Administration
Logs
Postman Collections
Tweaks
Enhancement
Request an Enhancement
Support
Contact Support
SmartExtractPickup
Pre-Requisites
The following core software must be installed / licensed for before applying SmartExtractPickup:
Mandatory:
• DbLogin
• DbArchive
• DbForm
• The V1 SmartSuite
• V1Integration Server
• V1WebPortal
• SmartExtract
• SmartMail (including SmartMailSend)
• DbLogin Admin Console
• SmartConnect
• Vault
Optional:
• DbScanner
Assumptions
For the purposes of this document, the following assumptions are made, change as appropriate to your installation:
• The V1 directory is C:\V1Home
• Your SmartExtract queues have been created and you know the email addresses they have been assigned (for testing purposes)
Create a DbLogin Import User
Q: Why am I doing this?
A: A dedicated DbLogin user needs to be created, its sole job is to authenticate and permit files to be transferred into SmartExtract i.e. it’s not a physical person, just a means to get files into a queue.
1. Log in to the SmartSuite as an administrative user
2. Click on User Management > Manage users
3. Click on Add user
4. User Type = DbLogin User
5. User name = SE_IMPORT
6. User level = User
7. Password = Choose a password (take note of it, you’ll need it later in this document)
8. Role = admin*
9. Ensure Must Change Password is UN-ticked
10. Click Save
11. Open the DbLogin Admin Console
12. Find the SE_IMPORT user in the list and tick the box next to it
13. Click the Keys icon at the top
14. Right click on your environment (i.e. Live) and Add Application
15. Select dbarchive from the dropdown, click Add
16. Click Save
Your Import User is now ready to be used in conjunction with SmartExtractPickup.
NOTE: * If the Admin role does not yet exist, create it using the instructions as a guide.
Un-Compress SmartExtractPickup
From the zip file you’ve downloaded, un-compress in to your C:\V1Home directory, so you end up with:
C:\V1Home\SmartExtractPickup
Which contains the def and all the files required.
Import the SmartExtract DbArchive Table
Q: Why am I doing this?
A: This is an intermediary table to allow you to scan images in using DbScanner, or deposit images in via SmartDeposit.
SmartExtractPickup will be periodically polling this table for images and when found, extract them to then be imported into SmartExtract.
Once extracted and imported successfully into SmartExtract, the blobs added to this table are purged.
An xml file has been provided containing the schema required and it can be imported using the DbLogin Admin Console > DbArchive table editor.
NOTE: No existing tables will be lost / affected, the new table will be appended to those already present if applicable.
1. Open the DbLogin Admin Console
2. Click on the DbArchive Table Editor
3. Click on Import from XML
4. Browse to the C:\V1Home\SmartExtractPickup dir and select tables_SE.xml
5. Click Open
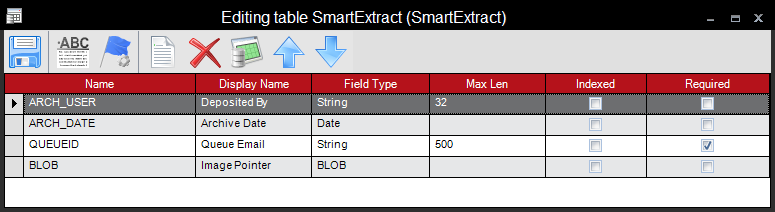
6. After a brief pause, the SmartExtract table should appear:
7. Close the DbLogin Admin Console
Configure DbScanner to import into SmartExtract
This is very much optional, but if the customer has a required to scan paper documents into SmartExtract, they can configure DbScanner to import them into the table created in the previous chapter.
Assumptions
A ScanSource has already been configured
1. Open DbScanner
2. Go to Configuration > Configure Scan Profiles > Add/Edit local scan profile
3. Click Add
4. Give it a name SmartExtract
5. Click Make One-Click toolbar
6. Select the default scan source from the dropdown
7. Click Process Settings
8. Tick the box for Enter/Review tags before scanning
9. Select None from the Tag validation type dropdown
10. Click Destination Details
11. Reflect below:
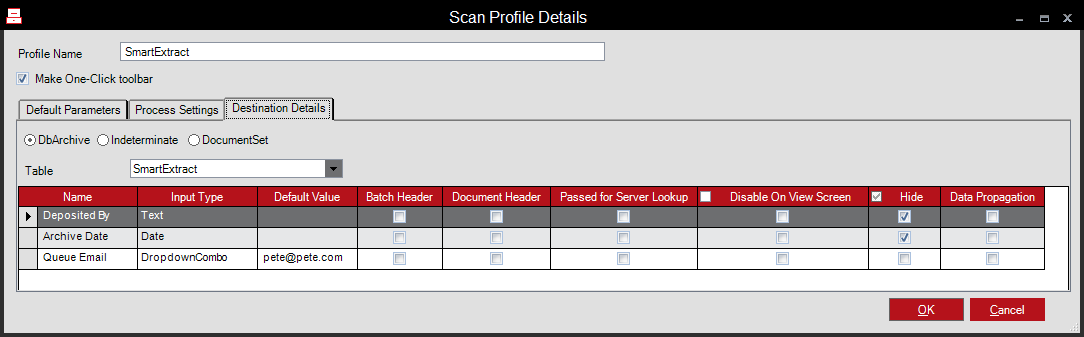
NOTE: The Input Type as a DropDownCombo requires you to populate the Default Value cells with your SmartExtract Queue email addresses.
12. Click OK
Now when you click your SmartExtract One-Click Toolbar, you will be asked for the Queue email matching the one you’ve created in SmartExtract where the scanned image will ultimately be uploaded too.
Configure SmartMail to import into SmartExtract
Assumptions
A mailserver is available
The mailboxes for each of your SmartExtract queues have been created and you know the credentials for each of them:
1. If started, stop the V1SmartMail service
2. Open a dos prompt, CD to the SmartMail directory and type
node.exe src/app.js config
3. Press enter
4. Open a web-browser and enter
http://localhost:8444/
5. Set the Cycle mailBoxes to Run continuously and Poll time in seconds to 60
6. Click Add New MailBox and reflect below changing only the values to match the emails addresses / paths you’ve created. Leave everything else as is.
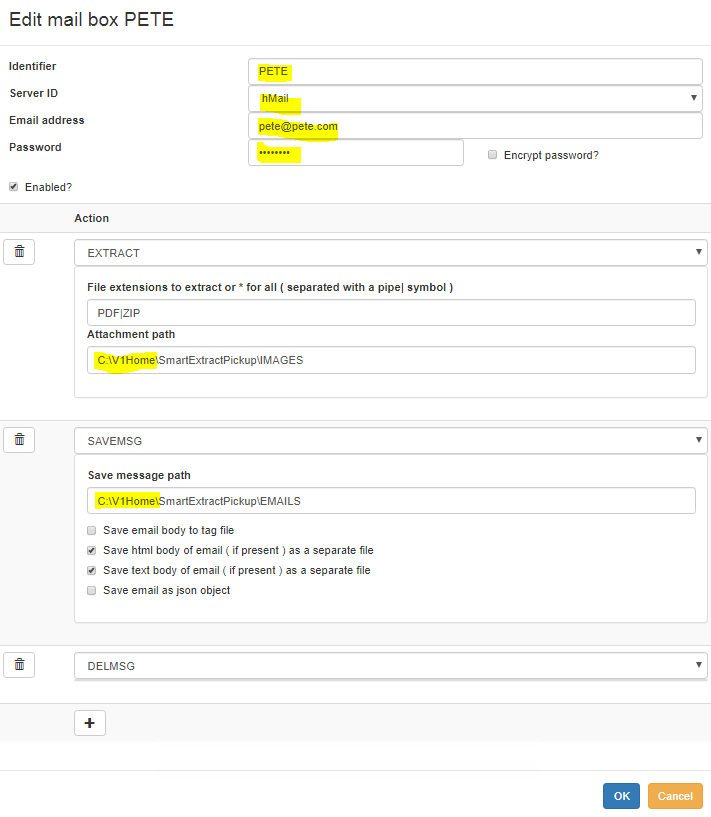
Repeat the above for each SmartExtract mailbox queue required
8. When done, click Save configuration at the bottom
9. Click Configure SMTP, add / test an outbound email which will be used for alerts
10. When done, click Save configuration at the bottom
11. Start the V1SmartMail service
Configure Vault
Using your browser of choice, connect to the V1 Server and navigate to http://localhost:8200
Where promoted, enter the Token
1. Click Sign In
2. Click kv
3. Click Create secret
4. Enter the Path for this secret to be SMARTEXTRACT_PICKUP (NOTE: This MUST be in UPPERCASE)
5. Toggle the JSON button so you see a black Secret data screen with blank values
6. Navigate to the C:\V1Home\SmartExtractPickup directory
7. Open the Vault_settings.json file in your text editor of choice and copy the contents to your clipboard
8. Paste it into the Secret data screen
9. Click Save
10. Un-toggle the JSON button
You have now imported all the settings required and they contain sample values, the table below explains what each of them represent, click Edit secret to change them and Save when satisfied they are correct.
| Key | Values | Explanation |
| CLEANUPPROCESSED | 1 0 |
1 Means activate clearing up the PROCESSED dir 0 Means never clear it |
| CLEANUPPROCESSED_DAYS | 15 | The number of days PROCESSED files are before they’re cleaned up if CLEANUPPROCESSED = 1 |
| CURLEXE | C:\V1Home\SmartExtractPickup\curl-7.53.1\src\curl.exe | The full path to curl.exe |
| EMAILONFAILURE | 1 0 |
1 Means activate emailing a user to inform them of a failure to import a document into SmartExtract 0 Means de-activate |
| EMAILONFAILURE_ADDRESS | myuser@mycompany.com | If EMAILONFAILURE = 1 set the email address to be informed of failures |
| IMPORTPASSWORD | MyPassword123 | The SE_IMPORT DbLogin password |
| IMPORTUSER | SE_IMPORT | The SE_IMPORT DbLogin username |
| INUSEDBAQUERYPORT | 31418 | The DbArchive query port |
| INUSEDBASERVER | 127.0.0.1 | The IP Address / DNS of the DbArchive server |
| NISURL | http://127.0.0.1:6181/api | The base NIS URL. NOTE: Browsing to this should resolve to a list of API’s |
| QPDF_CMD | C:\V1Home\SmartExtractPickup\qpdf-10.0.1\bin\qpdf.exe | The full path to QPDF.exe |
| SMARTEXTRACT_DBA_TABLE | SMARTEXTRACT | The name of the SmartExtract staging DbArchive table holding archived images |
| SMARTEXTRACT_PICKUP_DIR | C:\V1Home\SmartExtractPickup | The base dir of SmartExtractPickup off which the files processed are held |
| V1_DIR | C:\V1Home | The V1Home dir |
Install the SmartExtractPickup service
The final step is to install and start the SmartExtractPickup service which will poll the directories in the C:\V1Home\SmartExtractPickup directory each having a role in importing images.
All of the below directories are created automatically by the SmartExtractPickup.def the first time it runs, but for information purposes:
C:\V1Home\SmartExtractPickup\DECRYPT
A temporary storage area for PDF’s being decrypted
C:\V1Home\SmartExtractPickup\EMAILS
A temporary storage area for eml files downloaded from SmartMail
C:\V1Home\SmartExtractPickup\FAILED
A temporary storage area for any files that have failed decryption or import into SmartExtract
C:\V1Home\SmartExtractPickup\IMAGES
A temporary storage area for images either extracted from SmartMail emails, or scans / SmartDeposit’s into the SmartExtract DbArchive table to be exported into SmartExtract
C:\V1Home\SmartExtractPickup\TEMP
A temporary storage area for images scanned into the SmartExtract DbArchive and extracted to then be exported into SmartExtract.
A sub-directory is created beneath this for each BLOB that’s extracted and a text file containing the queue email of its destination and a text file with the blob type.
C:\V1Home\SmartExtractPickup\PROCESSED
A temporary storage area for images successfully processed.
This directory can be periodically purged using the Vault options detailed in the previous chapter.
NOTE: If you are NOT installing to C:\V1Home, using a suitable text editor, change the paths in the ini and *.bat files to match you actual install path. If changed, save them.
1. Right click / Run as administrator > !!RUNMEFIRST.bat (this sets all the paths to your current directory)
2. Right click / Run as administrator > !Install_SmartExtractPickup.bat
3. Right click / Run as administrator > !Start_SmartExtractPickup.bat
4. Open services and check it’s there and started
5. Wait 60 seconds, then check C:\V1Home\logs\SmartExtractPickup.log exists
6. Open it
7. Check for any issues, if all is well, close it
You’re done.
You can now copy the server side *.def file prior to testing which facilitates importing images from SmartDeposit or DbScanner:
1. Navigate to C:\V1Home\SmartExtractPickup
2. Take a copy of SmartExtract.def
3. Copy it into the C:\V1Home\DbArchive dir
How to Test Manually
If you have a requirement to 'run it right now' rather than waiting for a tick, you can test it manually as below:
1. Open a CMD prompt and CD to the C:\V1Home\DbForm\bin directory
2. Copy and paste the below (all on one line) into the CMD prompt
dbform.exe -l C:\V1Home\logs\SmartExtractPickup.log C:\V1Home\SmartExtractPickup\SmartExtractPickup.def c:\V1Home\SmartExtractPickup\SmartExtractPickup.def
3. Press Enter
4. You will see in the foreground all activity and it will run as if it had been ran as the service, but straight away. Check the log for any issues.
How to Test Automatically
Assumptions
You are licensed for SmartDeposit
You are licensed for DbScanner
You are licensed for SmartMailSend
You are licensed for SmartExtract, queues have been added to SmartExtract and you know the email addresses
SmartDeposit
1. Log into the SmartSuite
2. Click on SmartDeposit
3. Browse for a PDF or ZIP or JPG or TIF
4. Select the SmartExtract table
5. Where prompted, select the Queue of the SmartExtract queue to be deposited into
NOTE: If only one queue is found, it will default to that and no selection is required.
6. Click Deposit document
7. Wait 60 seconds
8. Click on SmartExtract
9. Click on your Queue
10. Check the image(s) have arrived
DbScanner
1. Load DbScanner
2. Click on the One-Click toolbar
3. Select your Queue of the SmartExtract queue to be deposited into
4. Import / scan your image(s)
5. Click Export
6. Wait 60 seconds
7. Log into the SmartSuite
8. Click on SmartExtract
9. Click on your Queue
10. Check the image(s) have arrived
1. Send an email to your queue(s)
2. Wait 60 seconds
3. Log into the SmartSuite
4. Click on SmartExtract
5. Click on your Queue
6. Check the image(s) have arrived
