Information
What is SmartConnect?
Compatibility
Downloads
SmartConnect
SmartApprove
V1FilterMapMaintenance
V1HouseKeepingManagement
V1Logs2Email
V1UpdateService
Documentation
SmartConnect
SmartApprove
V1FilterMapMaintenance
V1HouseKeepingManagement
V1Logs2Email
V1UpdateService
Administration
Logs
Postman Collections
Tweaks
Enhancement
Request an Enhancement
Support
Contact Support
V1Logs2Email
Pre-Requisites
The following core software must be installed / licensed for before applying V1Logs2Email:
Mandatory:
• SmartConnect
• Vault
• The V1 SmartSuite
• SmartMail (including SmartMailSend)
• An inbound email address and it's credentials to use, to receive logs requested
• An outbound email address and it's credentials to use, to relay logs requested
• DbQDes
Assumptions
For the purposes of this document, the following assumptions are made, change as appropriate to your installation:
• The V1 Server components have been fully installed / implemented
• The Server Installation is applied to C:\V1Home
• The V1 server is named V1SERVER
Copy Files
1. On the V1SERVER, download V1Logs2Email.zip
2. Un-Compress it to a temporary location
3. Copy the folder beneath the root dir, i.e. C:\V1Home\ so you end up with C:\V1Home\V1Logs2Email which contains the files therein.
Install and Start the Service
1. Using File Explorer, navigate to C:\V1Home\V1LogstoEmail
2. Double click on !!RUNMEFIRST.bat to set the paths in all the files
3. Double click on !Install_V1Logs2Email.bat to install service
4. Double click in !Start_V1Logs2Email.bat to start the service
Configure Vault
On the V1 Server using your browser of choice, navigate to http://localhost:8200
Where promoted, enter the Token
1. Click Sign In
2. Click kv
3. Click Create secret
4. Enter the Path for this secret to be V1LOGS2EMAIL (NOTE: This MUST be in UPPERCASE)
5. Toggle the JSON button so you see a black Secret data screen with blank values
6. Using Windows Explorer, navigate to C:\V1Home\V1LogstoEmail
7. Open the V1Logs2Email_vaultsettings.json file in your text editor of choice and copy the contents to your clipboard
8. Paste it into the Vault Secret data screen
9. Click Save
10. Un-toggle the JSON button
You have now imported all the settings required and they contain sample values, the table below explains what each of them represent.
Click Edit secret to change them and Save when satisfied they are correct.
| Key | Values | Explanation |
| OPTIONS_EMAIL_LOG | 1 0 |
1 means activate V1Logs2Email 0 means deactivate it. A reply email will be sent to the requestor explaining the need to switch it on. |
| OPTIONS_EMAIL_LOG_BCCEMAIL | bccemailtoreceivelogs@mycompany.com | A blind carbon copy email who will receive logs requested. Optional. |
| OPTIONS_EMAIL_LOG_CCEMAIL | ccemailtoreceivelogs@mycompany.com | A carbon copy email who will receive logs requested. Optional. |
| OPTIONS_EMAIL_LOG_TOEMAIL | toemailtoreceivelogs@mycompany.com | A To email who will receive logs requested. Mandatory. i.e. you must have at least a To address. |
Configure SmartMail to receive requests for logs
The first email address to setup is an inbound one. This will be polled periodically for requests for logs:
1. If started, stop the V1SmartMail service
2. Open a dos prompt, CD to the SmartMail directory and type
node.exe src/app.js config
3. Press enter
4. Open a web-browser and enter
http://localhost:8444/
5. Set the Cycle mailBoxes to Run continuously and Poll time in seconds to 60
6. Click Add New MailBox and reflect below changing only the values to match the emails addresses / mailserver / paths you’ve created. Leave everything else as is.
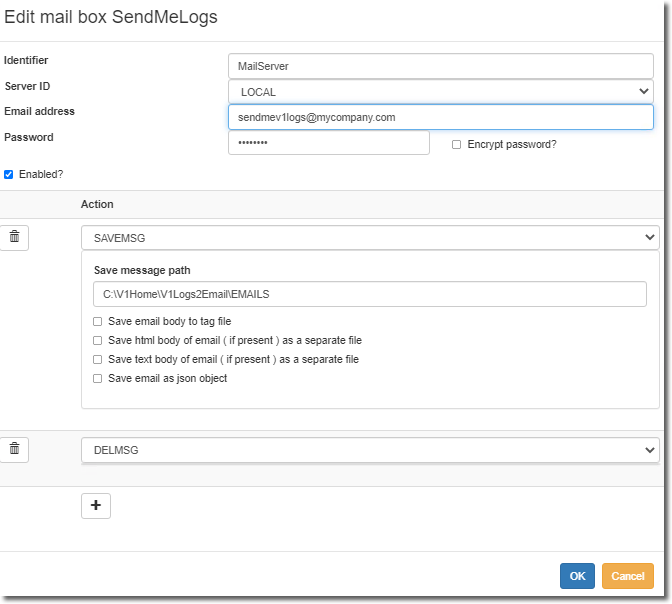
8. When done, click Save configuration at the bottom
Configure SmartMail to send logs requested
The second email address to setup is an outbound one. This will send the logs to the person who wants to look at them, i.e. one / all of the Vault OPTIONS_EMAIL_XXX email address / addresses you've configured:
Login to the V1SmartSuite as an administrative user, then complete the following steps:
9. Click Configure SMTP, add / test an outbound email which will be used to relay requests for logs
10. When done, click Save configuration at the bottom
11. Close your browser
12. Close the CMD window with SmartMail in debug mode
11. Start the V1SmartMail service
How to Test
Now you've completed the setup, it's a good idea to test it yourself prior to the customer.
The following subject lines are supported:
1. In Vault, ensure the OPTIONS_EMAIL_LOG value is 1
2. Set the OPTIONS_EMAIL_LOG_TOEMAIL address to your personal email address
3. From your laptop, send an email to the inbound address you created with a subject line of one of those supported, i.e. SMARTMAIL or SMARTCONNECT or SMARTEXTACT|86
4. If all is well, you'll get an email back with the logs you requested. You can now set the Vault options based on the customers actual email address(es).
If the log isn't found / perhaps not yet generated / the subject line is invalid, you'll get a reply with guidance on what to do.
